“The engine temperature gauge is normal, but I have no heat!”
The heater functions with the help of a healthy cooling system and the heater controls inside the passenger compartment. Depending on the symptoms, there are various reasons your customer’s heater might not be working. First, check the engine’s coolant level. If the coolant level is low, this may indicate that air is trapped in the heater core. Smooth coolant flow through the heater core is critical for heat output. Also, check coolant concentration. The mixture should be 50/50. A higher percentage mixture (more than 50 percent) will decrease heater performance. We all know that while the vehicle is running, heat produced by the engine is absorbed by the engine’s coolant, which then flows through the heater core, which is like a small radiator. Fans and blowers move fresh or recirculated air across the evaporator fins and heater core to provide heated air for the climate control system.
“ Even with the fan turned up high, it does not seem to ever blow cool air!”
If the A/C system is not cooling the vehicle to factory specifications: check to see if the A/C compressor clutch is engaged and the A/C system is fully charged. You will also want to check if the HVAC doors and the HVAC controls are working correctly.
An operational test will help you verify that all HVAC system controls and modes are operating correctly.
Air Conditioning (A/C) pressure diagnosis can also help pinpoint the concern with a malfunctioning system. However, knowing what the gauges say can be troublesome for some technicians. So we will take a look at pressure diagnosis, but we need to start by reviewing refrigerant and how to determine if it may be the cause of the concern.
Review of Refrigerant
Refrigerants are the vital working fluids in refrigeration systems. They transfer heat from one place to another. Heat is absorbed into the refrigerant by evaporation and released through condensation. In this manner, refrigerants change states as required by the system.
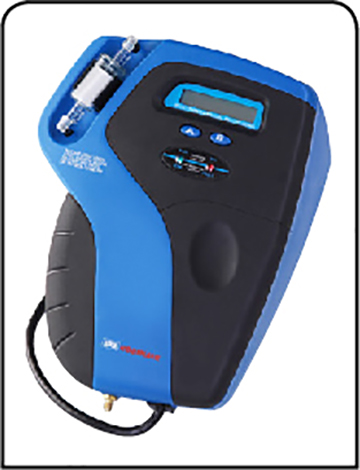
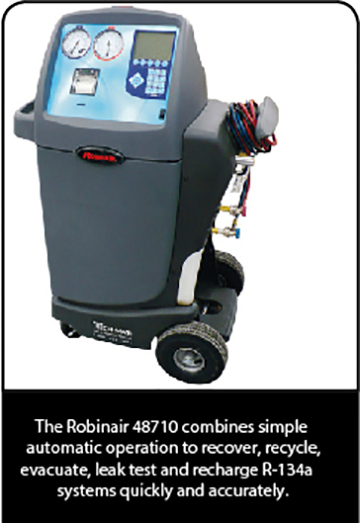
Refrigerant Purity Test
A tool that can identify the contents of an A/C system is essential in some diagnostic situations. The tool may also be required for A/C service centers according to regulations in your area.
If the refrigerant in a system contains excess air but has no other problem, removing the air will resolve a high pressure or loss of performance problem. In fact, SAE recommends that usable refrigerant should contain no more than 2 percent concentration by weight of non-condensable gas (air).
However, if the system contains air and/or other refrigerants (for example, blended refrigerants), then the contaminated refrigerant must be removed with special recovery equipment and sent off-site for processing or destruction. The equipment must be dedicated for the recovery of contaminated refrigerant only! Caution must be taken when flammable refrigerants have been detected, including the use of special air-powered recovery equipment.
Using a Go/No-Go refrigerant detector for both service situations can only identify system contamination. Without refrigerant identification equipment, the refrigerant containing only air would not be saved because the actual problem could not be identified with Go/No-Go equipment.
Refrigerant analyzers are available that meet or exceed SAE J2912 and can identify gas samples taken directly from the refrigerant system or storage containers. The analyzer (models vary) displays R-134a if the purity is better than 98 percent by weight. The unit displays FAIL if R-134a gas has not been identified or if it is not at least 98 percent pure. If the detected gas contains a hydrocarbon (flammable material), the unit sounds an alarm and displays HC. After analysis is made and displayed, the analyzer purges the unit of the sampled refrigerant and is ready for the next sample. Some units also indicate air concentration in addition to purity levels. Keep in mind that you could have 100 percent pure refrigerant that could still be considered unacceptable due to high levels of non-condensable gas. Features are available on certain models that allow the unit to accurately purge air to an acceptable level. This may be accomplished with the vehicle service valve or a refrigerant container.
If R-134a has not been identified as 98 percent pure, the vehicle’s A/C system should not be serviced with dedicated equipment. Always refer to the manufacturer’s instructions for proper use of the refrigerant analyzer.
NOTE: For more information regarding refrigerant contamination or disposal locations, contact the Environmental Protection Agency (EPA) hotline at 800-296-1996 or over the Internet at www.EPA.GOV/ozone.
Excess Air in the Refrigerant
If the recovery/recycling equipment is not used properly, air can enter the system and contaminate the refrigerant. Equipment with an automatic air purge usually keeps the air contamination level at less than 2 percent by weight, which is considered acceptable. However, recycling equipment with a manually operated purge can allow high levels of air into the system usually due to technician error. Recovery/recycling equipment that has a manual air purge should be checked every day before the recycled refrigerant is used. If the container pressure is not checked, air will transfer into the system.
Air can also be added during the refrigerant recovery process from system and service hose leaks. Recovery equipment that has an automatic shutoff at a predetermined vacuum level will not reach that level if a leak exists. The recovery unit will continue to operate, drawing in air from the leak source and adding it to the storage tank. If the recovery unit has a properly operating automatic purge, usually it will vent the excess air. If the air is not removed from the system, the system will have performance problems.
To perform top-quality A/C work, you will need to know if a container of recycled refrigerant is tainted with air. One way is to compare the pressure of the recycled refrigerant container with the pressure of a pure refrigerant container at a known temperature. If both pressures are equal, the refrigerant is considered acceptable.
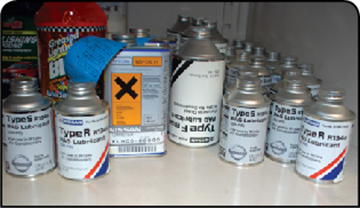
Use of Proper Lubricants
PAG Oils
Synthetic-based PAG oils are used with R-134a systems. PAG oils have a high hygroscopicity, which means they readily absorb moisture and retain it much easier than mineral oil. Always tightly cap all PAG oil containers after each use.
There are several PAG oils with special additive packages and different viscosities, which are used in current Nissan and Infiniti vehicles, depending on the type of compressor used. It is important to use the correct oil for the type of compressor being serviced. For vehicle specific information, refer to the appropriate Service Manual or the vehicle’s A/C decal.
It is very important to have the correct amount of oil in the A/C system. This not only enables the system to operate efficiently but also ensures proper lubrication of the compressor. Too little oil will damage the compressor. Too much oil will reduce the cooling capacity of the system.
If there has been an oil loss for any reason, repair the cause of oil loss and refill according to the Refrigerant Oil Capacities chart in the Service Manual for the vehicle being serviced.
NOTE: Refrigerant oils (PAG lubricants) are available through the Nissan Maintenance Advantage program. Go to www.NNAnet.com and click on the “Maintenance Advantage” link.
Diagnosis and Repair of Under Hood Components
Leak Test
A leaking A/C system indicates the system refrigerant level is lower than specification.
Any time more than 0.5 lb. (0.23 kg) of refrigerant is required to charge the system over a period of a year, a leak is present. Leakage can usually be traced to loose fittings, deteriorated hoses or seals, or damaged metal lines. Many leaks are the result of normal engine vibration, which loosen fittings and may lead to metal fatigue and cracks on metal lines over a period of time. In any case, these components must be repaired or replaced to prevent additional refrigerant loss.

Many refrigerant leaks can be found through a simple visual inspection. While small leaks of a few ounces of refrigerant per year are difficult to detect, larger leaks of about a pound per year can easily be isolated. This is because these large leaks may sometimes leave the system completely empty. If this is the case, first inspect the system for broken hoses or spring lock couplings prior to performing a leak test.
During the visual inspection, be sure to check the service fittings after removing the gauges. Oil, stains or dirt are good indications of a leak. Check the bottom of the evaporator housing for oil, because oil often accumulates there when the evaporator fails. Check for hose leaks and porous or worn tubing.
If the visual inspection fails to reveal the source of a refrigerant leak, test the system using either an electronic leak detector or a trace dye.
You may be required to add up to a pound of refrigerant in order to locate the leak. To locate the source of a large leak, listen for a hissing sound or spray some soapy water on components and look for bubbles.
To perform the leak test, the system must be under pressure. If the suction line is cold with the system operating, there is usually enough refrigerant in the system to perform the leak test. If not, refrigerant pressure can be supplied from a charging station although it is not necessary to completely charge a system for leak testing.
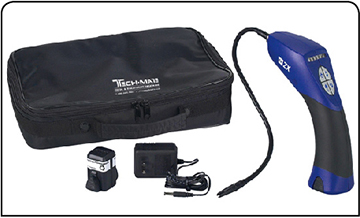
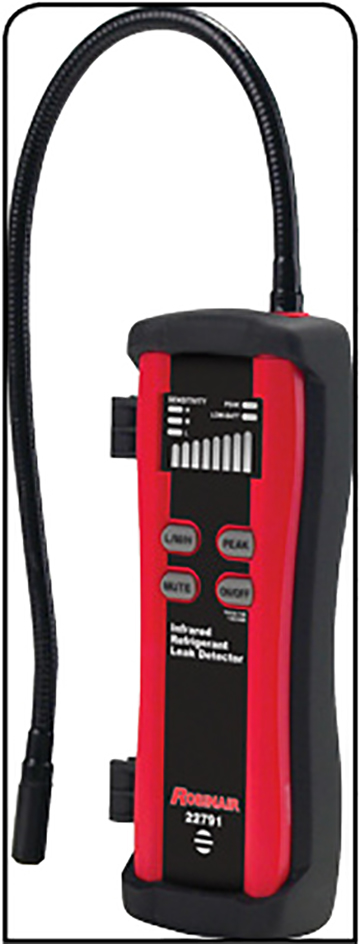
Electronic Leak Detection
Electronic leak detectors are an accurate way of locating even the most elusive refrigerant leaks. The electronic leak detector is a portable, electronic gas detector.
Electronic leak detectors must meet or exceed SAE J1627 to operate properly on R-134a. You should also be aware that there are different types of electronic leak detectors.
Some of the more common types available today are identified by the following classifications:
- Heated anode
- Heated solid electrolyte
- Corona suppression
Each type has advantages and disadvantages, which is why it is so important to follow the manufacturer’s operating instructions. Regardless of which type you have, all of them require some type of periodic maintenance to perform accurately.
One of the benefits of using electronic leak detection is being able to detect leaks at the time of A/C service. This reduces both refrigerant loss and time involved as in the case of trace dye.
As stated earlier, most refrigerant leaks will be found at fittings and connections. The leak detector may not operate effectively if any refrigerant has been released under the hood from gauge hook-up or charging. If this is a problem, use low-pressure compressed air or a fan to blow any released refrigerant from the engine compartment before leak testing.
To find a leak with an electronic leak detector:
1. Start the engine and turn on the A/C system. Let the system operate for 5 minutes.
2. Turn off the A/C system and the vehicle. Wait 2-7 minutes.
3. Turn on the leak detector. Most electronic leak testers have a battery voltage indicator, usually an LED display, which will illuminate. If it does not, replace the batteries before proceeding.
4. Search for leaks by slowly moving the sensor tip over all system components, including controls, seals and fittings.
5. The tester will emit a sound when the sensing tip detects refrigerant gases. Most electronic testers have a thumbwheel to adjust detection sensitivity.
NOTE: You may have to increase the detection sensitivity of the sensing tip itself. See the tester documentation for this procedure.
Trace Dye Test
Trace dye comes in different forms for a variety of fluids including: engine oil, transmission oil and engine coolant. There are also different types used in A/C service; therefore, it is very important that you use the correct type. Trace dye is mixed with a small amount of refrigerant lubricant. Compressor manufacturers are very concerned about the addition of lubricants other than those specified on the vehicle’s label. This also applies to trace dye; therefore, only use trace dye that meets or exceeds Nissan or Infiniti approval.
NOTE: All Nissan vehicles are originally built with refrigerant trace dye (usually a pellet placed in the Rec. Drier/liquid tank).
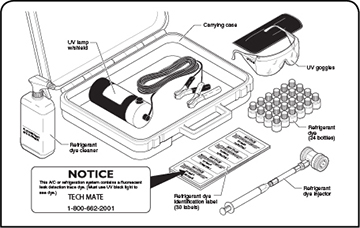
The J-43926 Air Conditioning Dye Kit provides you with a method for adding trace dye to the A/C system. However, adding more than specified to the A/C system will not make the leaks more obvious. In fact, adding too much may cause the A/C system lubricant additives and viscosity to break down.
As you go over the system, using the black light to check for indications of trace dye, do not forget to check the evaporator condensate drain. Any trace dye coming out of this location is a sure sign of an evaporator leak. On some vehicles, you may be able to view the evaporator surface with the black light by removing the fin probe assembly. A possibility exists that a small leak may occur without any signs of trace dye. Remember that the lubricant transports trace dye, and if the lubricant never reaches a leak source, no visual indications will be present. This is another reason why you still should use an electronic leak detector.
Finally, always attach the trace dye identification sticker in the engine compartment close to the A/C decal. This will inform other technicians that the system is already equipped with trace dye to prevent excessive amounts in the lubricant. During the black light inspection if signs of trace dye were evident and the leak source was repaired, you would need to clean the area using the appropriate trace dye cleaning solution. This will eliminate confusion regarding any leaks in the future.
NOTE: Trace dye is mixed with the PAG lubrication oil. The dye must circulate through the entire system before it will reach the source of the leak. Therefore, you must allow enough time for dye to circulate.
NOTE: Too much dye can affect the viscosity of the refrigerant oil.
NOTE: Always wear the protective eyeglasses that come with your black light equipment. This will enhance the luminescence of the dye, which will make the smaller leaks more apparent. More importantly, the eyeglasses protect your eyes from damaging ultraviolet light.
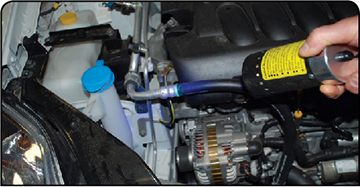
Follow these guidelines when you use trace dye to detect leaks:
1. Add minimal amounts of trace dye to the A/C system according to the dye manufacturer’s directions.
2. Operate the A/C system for 5-10 minutes to circulate the dye throughout the system.
3. Shine an ultraviolet lamp on the A/C system and look for traces of dye, indicating leaks.
4. Although large leaks will show up quickly, small leaks may take several days to appear using this method. For further information on this method of leak detection, refer to the instructions provided with the dye.
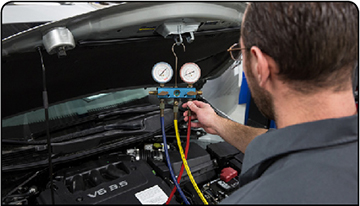
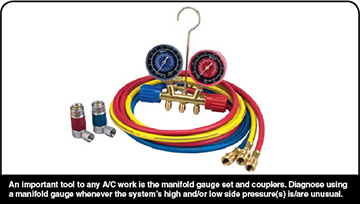
Manifold Gauge Reading Evaluation
Now that you are familiar with some diagnostic testing methods, it is time to evaluate some of the more common diagnostic scenarios you may encounter. When it comes to refrigerant system problems, you will need to be able to make a diagnosis based on pressure gauge readings. There are also a few techniques that will help confirm your suspicions regarding those pressure gauge readings.
Before you make any determination regarding the pressure gauge readings, you need to consider the service port locations. Remember, these are the locations on the system where your gauges actually monitor the pressure. Gauge readings may not always indicate the same pressure throughout the entire high side or low side of the system. You could have a low-pressure reading on the high-side gauge and still have a restriction on the high-pressure side of the system. If the restriction is located before the high-side service port, your readings will be lower than normal.
For example, if the high-side service port is located on the liquid tank and the hose between the condenser and the liquid tank is restricted, your gauge readings will be lower than you may expect.
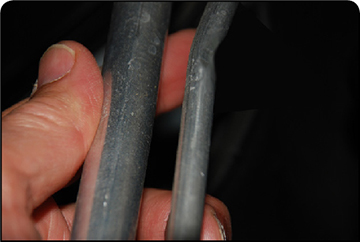
By reading the gauges alone, you may be misled into making an inaccurate diagnosis. Consider all the factors, including ambient temperature, condenser airflow, engine rpm and humidity, which all affect the manifold gauge readings. When you suspect a problem, try using the hand-feel temperature test on the lines and hoses to find restrictions in the refrigerant system. Be careful; high-pressure refrigerant lines may become very hot!
Place a temperature gauge in one of the air outlets in the passenger compartment. Place a second temperature gauge at the condenser to measure ambient (outside) air temperature. Both temperatures are usually needed to analyze system performance.
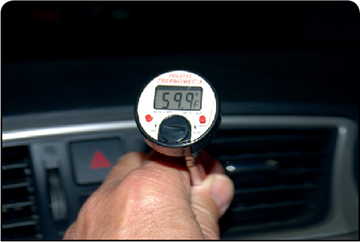
Read the pressure gauges and compare them to factory specifications. Note that pressure gauge readings vary with ambient air temperature, humidity and system design.
With an ambient temperature of 70° F (21° C), an orifice tube system with a cycling switch should have approximately 150-250 psi (1034.2-1723.7 kPa) high-side pressure and 24-31 psi (165.5-213.7 kPa) low-side pressure.
If your pressure gauge readings are not within factory specifications, there is a problem in the system. You need to use these readings, other symptoms, the Service Manual and your knowledge of system operation to find the trouble with the system.
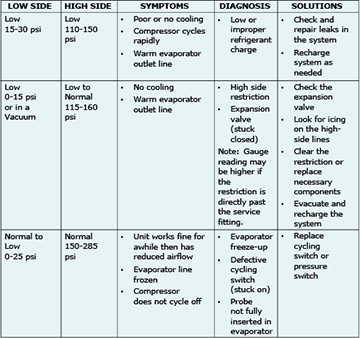
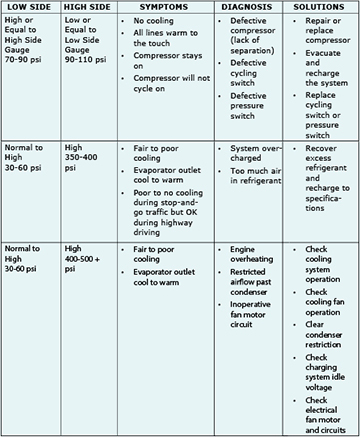
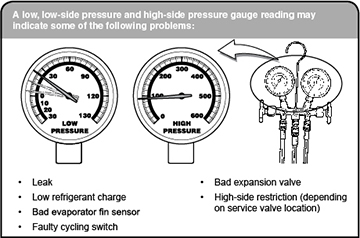
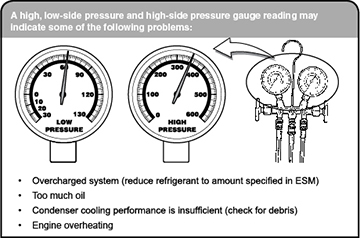
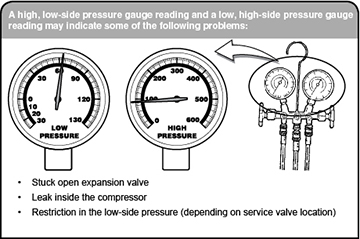
“What do the readings mean?”
NOTE: Refer to the HA section in the ESM for the applicable vehicle for pressure readings at various ambient temperatures and the setting the AC should be on when diagnosing with pressure gauge readings.
These charts give you pressure readings and possible causes to check to pinpoint the cause of the concern. They are just a guide to aid you in your diagnosis. You need to verify what is wrong before replacing any parts.