In this article, we will review some basics about tracking down and troubleshooting tire and wheel related vibration behavior. It also includes some tips and repair techniques to prevent vehicle shakes, shimmies or vibration conditions to help you improve your customer’s ride and comfort.

WHEEL AND TIRE ASSEMBLIES VIBRATION
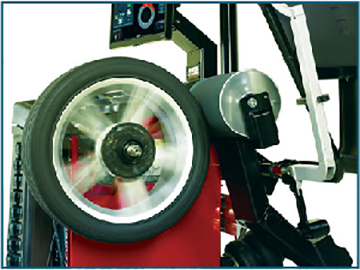
Many vibrations in a vehicle are cyclic – meaning they are a series of singular events that recur regularly (in a pattern). Sometimes there are harmonic vibrations (two events combining), but for the purpose of this article, we will stick with the basics. If you do not count the rotational mass in the engine (crankshaft/pistons/rods/etc.), the four biggest places that rotational vibration can happen are each of the wheel and tire assemblies. Typically large rotating masses like these act as a gyroscope, which is why a bicycle or motorcycle stays upright when the wheels are turning. But if their spinning is upset (made irregular), even just a little bit, by anything on a steady basis, there is a potential for vibration. There are basically two issues that can cause this upset: lack of correct balance or lack of roundness. Both can be caused by either the wheel or tire. But here is the twist, no amount of balancing can truly fix an assembly that is not round.
ISOLATING WHEEL AND TIRE VIBRATIONS
Vibrations are expressed as waves per second called Hertz (Hz). You can display the vibrations in a vehicle with the use of an electronic vibration analyzer. The frequency (Hz) of a vibration can help you isolate the possible cause. The wheel and tire vibration frequency is calculated by dividing the drive line frequency by the differential gear ratio. The differential gear ratio can be found in the ESM for the applicable vehicle model.
If you can focus on a vibrating component (low frequency), the vibration is probably caused by wheels or tires. Steering wheel shimmy (side-to-side movement of the steering wheel) is always caused by tire or wheel imbalance.
Vehicle shake (up and down movement of the steering wheel) can occur with balanced, non-factory tires and wheels. Tire shake and shimmy will vary with changes in vehicle speed. It is possible for tire shake to occur ONLY during braking. First-order tire or wheel vibrations usually produce a vibration frequency of 10-20 Hz.

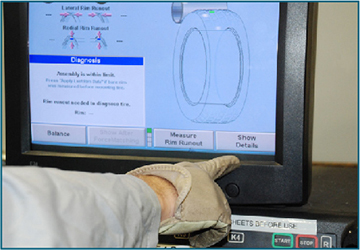
“But it looks round! How can it be out of round?”
Service Tip:
Always use the Vibration Diagnostic Worksheets to help with documenting and communicating with your customer. They are good tools that should help get you on the road to repairing a customer’s vehicle right the first time.
Wheels and tires on any vehicle are not perfectly round, but they need to be close, very close. Even tires and wheels manufactured to the tightest specifications are not perfectly round. But for the case of this discussion, we will break it up this way. If it is a wheel, we will talk runout. If it is a tire, we will talk Radial Force Variation (RFV).
RUNOUT
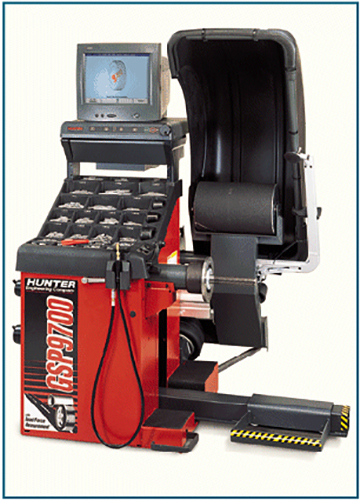
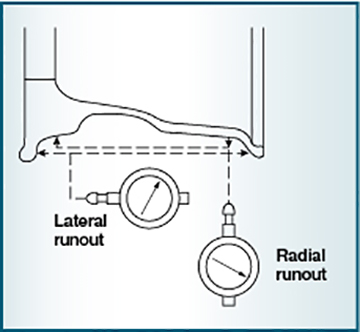
There is roundness you can see and some you cannot. When talking about roundness of wheels, there are two basic types: lateral runout and radial runout.
Lateral, or side-to-side runout, is the measurement of the sideways motion or wobble in a wheel or tire as it rotates (or how true the wheel’s tire bead seat is to the wheel’s centerline). Problems are more common in steel wheels, such as a steel wheel that has been hit hard at an angle against a curb or involved in other impact damage. This can be easily measured with a dial indicator. Specifications are given in the FA or WT sections of the Service Manual.
Radial, or up and down runout, is an out-ofround condition, like an egg shape in the radius or circumference of the wheel or tire. You might think of this as a wheel that has been hit hard directly against (straight into) a curb or severe pothole. But a brand-new wheel can have a very slight amount of radial runout, not be damaged, and still be within specifications. When many Nissan wheels are made, they are marked on the rim with a white dot. That dot marks the low point of the radial runout. There will be more information on this later in this article.
NOTE: Any time a wheel has radial or lateral runout in excess of the manufacturer’s specifications, the wheel should be replaced.
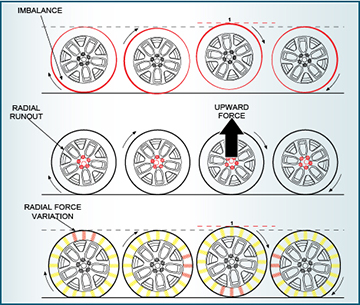
RADIAL FORCE VARIATION (RFV)
Radial force variation, or RFV, is a term used to describe variations in the stiffness in the sidewall of a tire and is a measurement of the tire’s uniformity under load. These variations reflect the force that is applied to the suspension and the axle as the tire turns. Tire RFV measures the variation of sidewall compression that occurs (up and down) as the tire rotates and flexes against the load action on the spindle. Tire/wheel assembly uniformity can only be measured under load. A tire with noticeable RFV will produce a vibration, which produces a shake even though the tire/wheel assembly is thought to be perfectly balanced and within radial and lateral runout specifications. These vibrations feel similar to an imbalance condition.
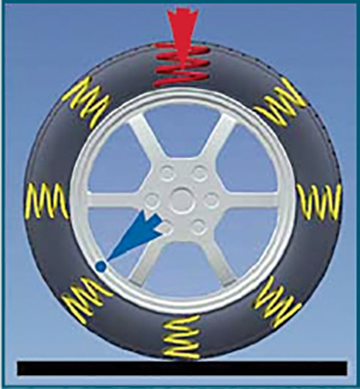
The primary symptom for RFV is: first order vibration, which means that varied force is exerted on the axle once per revolution, or RH1. RH1 vibration causes the road wheel to hop/bump once per revolution. RH2 vibration causes the road wheel to hop/bump twice per revolution. All tires have some sidewall variation due to the overlapping of the plies during the construction of the tire. Stiffness variations can still be found on both new and worn tires. Factory tires and wheels are assembled to minimize the effect of RFV on vehicle performance.
Second order vibration almost always appears as a vertical steering wheel vibration at freeway speeds. The resonance or frequency of the steering column structure is generally in the 28- 40Hz frequency range. This can be excited when a high second order tire is connected to the front suspension. Due to the higher frequency, this vibration feels more like a buzz than a shake.
The most common symptom of a tire with excessive RFV is a first order vibration, which is one stiff spot in the sidewall that causes the tire to deflect and move up and down as it flexes.
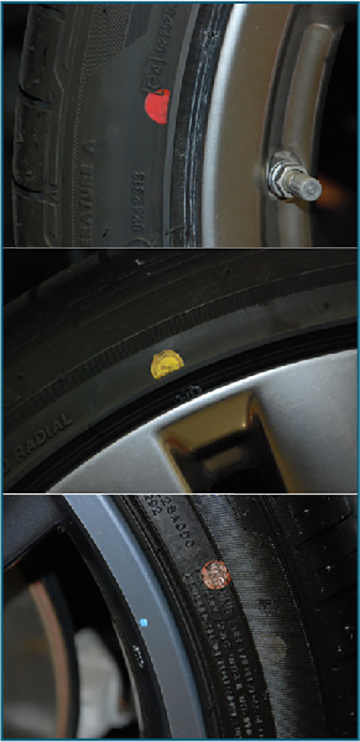
Markings are used by most tire manufacturers to indicate how the tire should be positioned on the wheel to reduce the effects of RFV. A red paint mark or a yellow temporary tape strip on the tire indicates the point of the greatest tire runout. A blue mark on the wheel is the point of minimum wheel runout, indicating the lowest spot of the wheel. During assembly, these marks on the tire and wheel are aligned to help minimize the effect that RFV has on ride smoothness. In addition, factory-installed tires have a yellow paint mark at the lightest point on the tire. If a non-factory or replacement wheel is installed on your customer’s vehicle, the yellow mark can be aligned with the wheel valve stem opening to minimize the weight required during balancing.
TIRE INDEXING
Manually isolating road force variation is a process where a tire’s installed position is specifically selected to help minimize the final combination’s force variation and/or imbalance. To do this, align the tire’s measured high spot of radial force variation with the measured low spot on the rim. To start this process, mark the location of the valve stem on the tire then perform a runout measurement of the tire and wheel assembly and mark the highest spot on the tire.

Now remove the tire and perform a runout check on the wheel itself for radial runout of the wheel. Mark the low spot on the wheel. This would also be a good time to check the lateral runout of the wheel to verify that it is not the cause of the concern.
If the runout is greater than 1 mm, break the bead and remount the tire onto the wheel shifting the phase of the tire on the wheel 180 degrees and then if necessary in increments of 90 degrees until the smallest amount of tire or wheel runout is attained, indexing the tire to the wheel.
NOTE: If you are trying to ensure proper bead seating to control runout, make sure to use plenty of lubrication on the tire bead when remounting.
After remounting the tire onto the wheel and matching the low spot on the wheel with the high spot on the tire, recheck the tire or wheel runout.
Measure the radial runout of the tire and wheel assembly to verify it is within specification.
Rebalance the tire and test drive the vehicle.
BALANCE CORRECTION
Just like a tire can have a stiff spot, tires can have heavy spots. They can be in the tread center or side or in either or both sidewalls. Centrifugal force, like swinging a rock on a string, pulls the tire in the corresponding radial or lateral direction as the weight. Also, the taller the tire, the more pronounced this effect. Providing this imbalance is not too excessive, it can be corrected with proper balancing. There are two types of balancing: dynamic balancing and static balancing. In the dynamic balancing process, the tire is balanced in both the vertical plane (radial, or up and down balance) and the horizontal plane (lateral, or side-to-side balance). The weights are placed on different spots on both the inside and the outside wheel rims. In static balance, the wheel is balanced in only the vertical plane (radial, up and down balance).
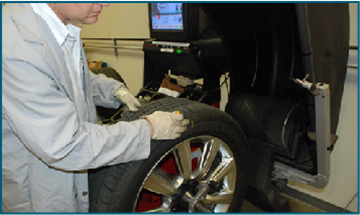
Using the Tire Balance Machine: Some General Principles
Modern “off-the-car” spin balance machines really simplify the process of balancing wheel and tire assemblies. However, to stay out of trouble, a few general operating principles should be followed. Also, it is important that the machine is inspected periodically and maintained as needed.
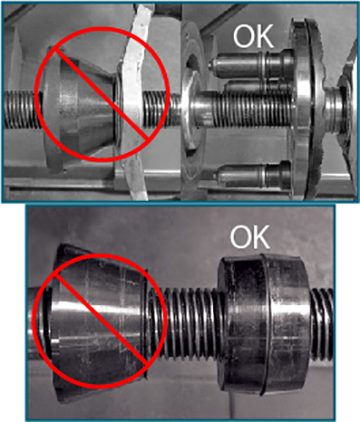
Correct Wheel Mounting Techniques
When mounting a wheel and tire assembly onto the balancer:
- Make sure that the cone and backing plate are clean.
- Always use the lug adapter plate if indicated.
- Make sure the wheel is flush against the spindle’s backing plate.
- After tightening the wing nut, rotate the tire by hand; make sure it does not wobble because of incorrect mounting or a bent wheel.
To increase tire/wheel assembly balancing accuracy, these steps should be followed:
- Set the tire pressure to the tire placard pressure.
- Choose the appropriate wheel centering balancer collets and flange plate.
- Choose the correct road wheel centering tool.
- Determine the road wheel-to-collet contact area for proper centering.
- Choose the correct securing device.
- Properly mount the tire/wheel assembly to the wheel balancer.
- Make sure the tires and wheels are free of debris.
Is Our Shop Balance Machine Accurate?
You can check the accuracy (calibration) of your shop tire balance machine fairly easily:
- First, balance a wheel and tire assembly as you normally would.
- After the indicated weights have been installed, rotate the tire until the valve stem is straight up.
- Loosen the wing nut, and while holding the balancer’s backing plate, rotate the wheel/tire assembly 90 degrees then retighten the wing nut.
- Re-check the balance again; the readout should be the same as the first balance. If the readout is different, the machine needs to be calibrated. Check your machine’s Operating Instructions or Owner’s Manual. In many cases, it can be calibrated following some simple instructions.
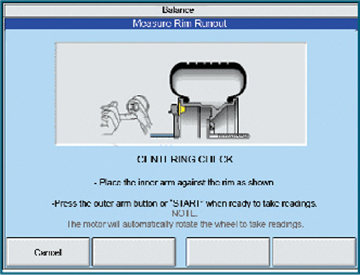
WHEEL CENTERING QUICK CHECK
Run the tire/wheel assembly on the wheel balancer in the “non-round-off” mode and record the imbalance measurements.
- Mark the location(s) where the weight(s) is requested.
NOTE: Center Check™ may be used with either a bare rim or a rim with tire assembly. The Center Check™ feature can be used to automatically identify any centering errors and confirm if the wheel is centered on the balancer.
Loosen the wing nut while keeping the tire/wheel assembly from turning on the balancer shaft.
Rotate the tire/wheel assembly 180 degrees on the balancer shaft and then secure it with the wing nut.
NOTE: Slowly rolling the wheel toward you helps improve accurate wheel centering since the wheel is allowed to roll up the taper of the cone.
Run the tire/wheel assembly again.
- The imbalance values should be within ¼ oz (7g) of the values of the first test.
- The weight(s) should be located within 2-3 in. (50-75mm) of the locations of the first test.
UNIFORMITY CHECKS
- Perform a uniformity check on the tire/wheel assembly.
- Mark the high spot on the tire.
- Write the final Radial Force Variation (RFV) reading on the tire.
NOTE: These are guidelines only. Some vehicles may require a lower uniformity value to correct vibration conditions.
TIPS ON MOUNTING WHEELS TO VEHICLE
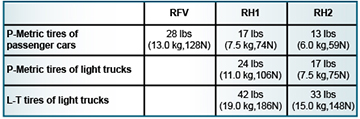
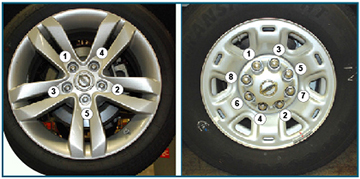
Install tires from lowest to highest RFV. Refer to the tables below for the recommended tire/install position:
Car/SUV

To Correct Truck Steering Shimmy Conditions

To Correct Truck Body and/or Truck Bed Vibration Conditions
NOTE: With the vehicle on a lift, always make sure the high spot marking is UP before handtightening and then torquing the lug nuts to specification. With the vehicle on the ground after hand tightening the lug nuts, always make sure the high spot marking is DOWN before torquing to specification.
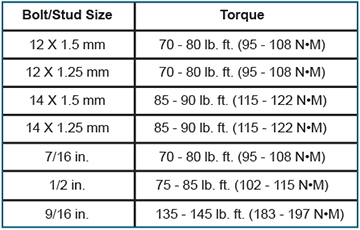
LUG NUT TORQUE
Follow a star pattern when tightening the lug nuts and torque them to the recommended specification for the vehicle.
What Kind of Machine Should I Use?
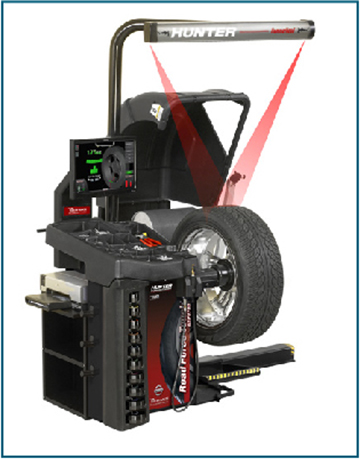
It goes without saying that you should not use bubble balancers or the old school, on-the-car type wheel balancers. If your shop has a good, older, off-the-car, spin-balance machine, just make sure it has been properly maintained and that it is accurate. Now what if your shop machine is starting to lag a little? No problem, check out the new ones in your Nissan TECH-MATE equipment catalog. A new machine will help save time and provide more accurate wheel balancing to keep your customers happy and coming back for more good service.
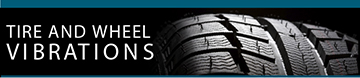
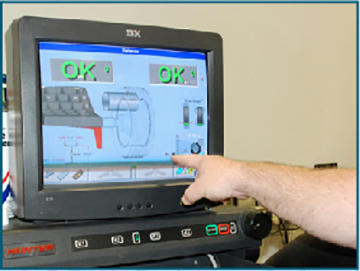
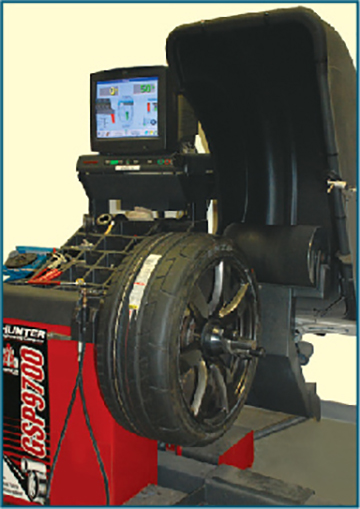
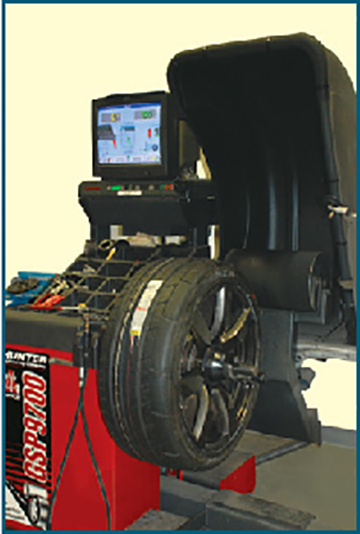
Regarding the new machines available, we put our engineers to work here evaluating different tire machines. The equipment they felt was up to the task is the Road Force Touch® GSP9700. The Road Force Touch® GSP9700 provides complete wheel diagnostics as fast as a traditional balancing machine. It features ForceMatching® that locates the stiffest area of a tire and the lowest spot on a rim to be marked and match-mounted to help cancel radial force variation.
Enough talk; now we will get into fixing these shakers. It is pretty straightforward if you follow the steps!
DIAGNOSIS STEP 1:
Give it the once-over.
Even the simplest checks can solve complicated incidents. By examining the car, obvious conditions can be noted. Also, a preliminary examination will help make sure that there are no surprises during a road test.
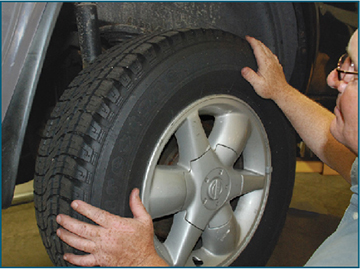
Put the vehicle on a lift and inspect the wheels and tires for tire pressure, tire wear and condition. Low tire pressure influences Cold Tire Flat Spotting, radial force variation and tire spring rates. Turn each tire and wheel and look for bent wheels and for bubbles or bulges in the tread and sidewall areas – which may indicate tread separation. Also check the wear pattern of the tires – uneven wear spots can indicate tire imbalance and suspension looseness.
Grasp each tire and wheel assembly and shake it from side-to-side to determine the location and extent of any looseness. Loose wheel bearings or suspension bushings can contribute to balance-related vibration incidents.
DIAGNOSIS STEP 2:
Name that shake.
It is always important to fully understand what you are up against. This will help provide focus when you are troubleshooting. The best way to do this is to road test with the customer. This gives you the chance to discuss the customer’s view of the symptoms and to experience the incident firsthand. Most types of vibrations can be placed in a few broad categories:
- Steering wheel shake: A low frequency vibration with an up and down shake that is easy to see and feel.
- Steering wheel shimmy: A low frequency vibration with a side-to-side shake that can be felt and seen in the steering wheel.
- Cabin vibration: A high frequency vibration that is felt in the seat, body panels, transmission shift lever or steering wheel. It is difficult to see but easy to feel and sometimes can be heard.
- Continuous bumping: Heard or felt when the car is in motion.
DIAGNOSIS STEP 3:
Describe when it happens exactly.
Now you need to check when the vibration is most noticeable:
- Only in the first 15 minutes of driving in the morning or after several hours of vehicle cool down.
- Any time, cold or warm.
- Only when the vehicle is fully warmed up after 15 minutes or more of highway driving.
- Only when braking (probable brake incident).
- When making tight, slow-speed turns.
- Only when the transmission is in a particular gear.
DIAGNOSIS STEP 4:
Nail down the incident speed.
- Broad range: Below 50 MPH, such as 35-45 MPH or 25-50 MPH.
- Broad range: Above 50 MPH.
- Narrow range: Above 50 MPH, such as 54-58 MPH.
- When driving at a particular engine rpm or load.
Now that you have a broad picture of the vibration, we will break down into different, specific conditions.
CONDITION 1
Steering wheel shake, or shimmy, or thumping, like the tires are rolling over small bumps.
- This only happens in the first few minutes of driving in the morning or after a long cool down period.
- vibrations decrease significantly after 10 or 15 minutes of driving.
Cause: Cold Tire Flat Spotting
- Cold tire flat spotting is when tires start to take a “set” after staying in the same position for a long time. This may happen when a car is parked overnight.
- Think of this as a temporary change in the tire’s radial runout.
- Low pressure can also contribute to this condition.
- It may occur more frequently with high performance tires with an H speed rating although some amount of flat spotting is normal for H-rated tires.
Repair:
- In most cases, the issue can be corrected by adjusting the pressure to correct specification and driving the vehicle at highway speeds for 15 to 20 minutes.
CONDITION 2
The vehicle has steering wheel shake or shimmy at any time during driving.
- It may happen when the vehicle is warm or cold.
- It is usually most noticeable on smooth roads within a narrow range of speed over 50 MPH, such as from 54-58 MPH.
Cause: Tire Imbalance, Radial or Lateral Runout or Radial Force Variation
- To figure out which of these is the culprit, we will need to dig a bit deeper.
- How you proceed depends on the tools you have available.
- If you have a known-good donor vehicle (one that you are sure does not have the vibration) available:
Repair:
1. Swap all four wheel/tire assemblies and verify the vibration no longer exists.
2. One at a time, return the originals to the vehicle, beginning with the front tires. Test drive after each is installed to isolate which assembly is the cause.
3. Proceed to Wheel Balance check.
- If you do not have a known-good donor vehicle, proceed to Wheel Balance check.
A. Wheel Balance
- Perform a thorough balance service to all of the wheel and tire assemblies.
- Be sure to use the tips in this article and follow the balancing machine’s instructions.
- If the wheel is properly balanced and there is still a vibration:
1. The wheel may have excessive runout.
2. The tire may have excessive RFV.
B. Check Runout
- When a wheel and tire assembly is balanced but is “out of shape,” there may be a vibration with the same symptoms as imbalance.
- Use a dial indicator to measure wheel runout.
- Maximum runout specifications can be found in Service Data and Specification at the end of the WT section in the Service Manual.
- Bent or deformed wheels should be replaced.
- Improper runout is more common in steel wheels than in alloy wheels.
C. Radial Force Variation (RFV)
- Remember, a tire with excessive RFV can be perfectly round and perfectly balanced, but the response of the tire on the road can end up as a constant thumping or vibration, similar to an out-of-balance wheel.
- Sometimes excessive RFV can be caused by tires that are not seated correctly on the wheel lips. RFV can be compensated for by re-indexing the tire to the wheel, but without a tool to tell you which way to go, it is guesswork at best.
- Working with excessive RFV is best done using a high-end balancing machine, one capable of dealing with the condition effectively.
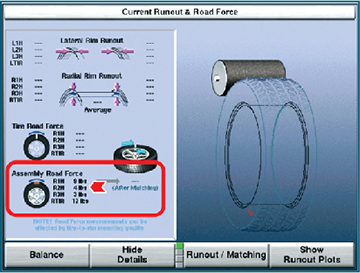
- The Hunter GSP9700 can check for radial force variation by loading the tire with a roller. If you suspect a tire has excessive RFV, follow the balancer manufacturer’s instructions for working with the wheel and tire assembly in question as part of the wheel balance.
- When preparing to check a tire for excessive RFV:
1. First, set the air pressure in all 4 tires (remember, low tire pressure influences cold tire flat spotting, RFV and tire spring rates).
2. Drive the vehicle at highway speeds for 20 minutes to make sure the tires are not cold flat spotted. Then immediately put the vehicle up in the air on a hoist.
- Follow all mounting cautions of the wheel/tire on the spindle/cone of the balancer. The mounting must be concentric (no wobble!).
- Once run, an RFV-capable balancer’s program may suggest re-indexing the wheel/tire assembly.
- To do this, its program will direct you to mark the tire and wheel, dismount the tire from the rim and re-index the tire to the mark it directed you to put on the wheel. Apply plenty of the tire lubrication to the wheel and the tire. RFV can be affected by the tire not being completely seated on the wheel. Re-check the tire/wheel assembly.