COMFORT and CONVENIENCE
Entry/Exit Function
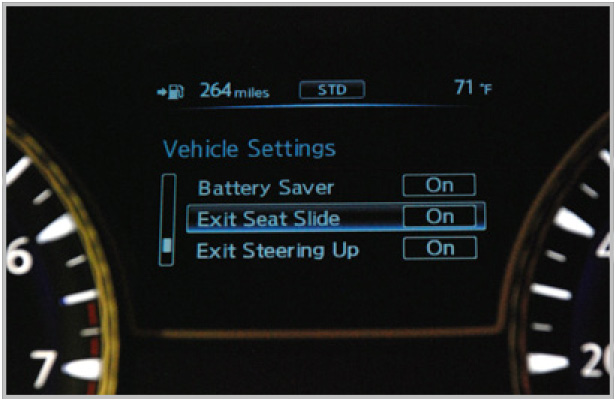
This system is designed so that the driver’s seat and steering column automatically move to a set position. This feature operates when the shift selector is in the P (Park) position when the driver’s door is opened. This allows the driver to get into and out of the driver’s seat more easily.
The entry/exit function can be adjusted or canceled through the Vehicle Settings in the vehicle information display by performing the following:
- Switch the Exit Seat Slide from ON to OFF.
- Switch the Exit Steering UP from ON to OFF.
Restarting Entry/Exit Function
If the battery is disconnected or replaced while performing repairs or maintenance, entry/exit will be disabled.
Install the new battery or reconnect the battery cable. Drive the vehicle over 25 MPH to restart the entry/exit function. Or, open and close the driver’s door more than two times with the ignition switch in the lock position.
Automatic Drive Positioner
The JX vehicle can be equipped with an automatic drive positioner system which can be set to memorize two positions for driver’s seat, steering column, and outside mirror including convenience features such as:
- Memory storage function such as climate, navigation and audio system.
- Entry/exit function
- Seat synchronization function
To memorize position settings into the memory system:
1. Set the CVT shift selector to the P (Park) position.
2. Place the ignition in the ON position.
3. Adjust the driver’s seat, steering column and outside mirrors to the desired positions by manually operating each adjusting switch. During this step, do not place the ignition switch in any position other than ON.
4. Push the SET button and, within 5 seconds, push the memory button (1 or 2).
The indicator light for the pushed memory button will illuminate and stay on for approximately five seconds after pushing the button. After the indicator light goes OFF, the selected positions are stored in the selected memory (1 or 2).
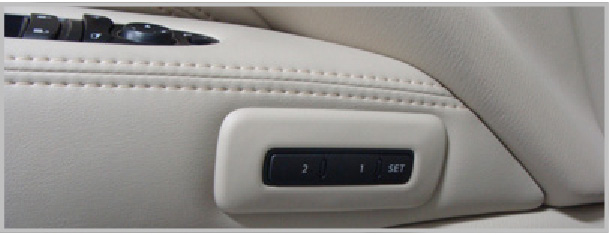
Linking a keyfob to a stored memory position
Each individual intelligent key programmed to the vehicle can be linked to a stored memory position (memory switch 1 or 2) with the following procedure:
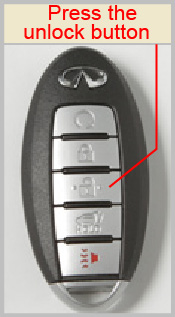
1. First, follow the steps for storing memory function.
2. While the indicator light for the memory button being set is still illuminated (approx. five seconds) press the unlock ![]() button on the keyfob.
button on the keyfob.
The indicator light will blink. After the indicator light goes off, the keyfob is linked to the memory settings.
Adding New Memory Positions
Note: If a new memory position is saved to the memory switch, the keyfob automatically re-links.
Setting Memory Function
These memory settings can also be set and available for each Intelligent Key:
- Climate control system
- Navigation system (if equipped)
- Audio system
To use the memory function, set the climate, navigation and audio systems to the driver’s preferred settings. Lock the doors with an Intelligent Key. Each Intelligent Key may be set with the driver’s individual preferences.
If the Battery is Disconnected
Important Note: If the battery cable is disconnected, or if the fuse opens, the memory storage function will be canceled and must be restarted before a stored memory position can be set again.
Drive the vehicle over 25 MPH (40 km/h) to restart the memory storage function. You can also restart the memory storage function using the following procedure:
1. Connect the battery cable or replace the fuse.
2. Open and close the driver’s door more than two times with the ignition switch in the LOCK position.
Once the memory storage function has been restarted, you can store a memory positions.
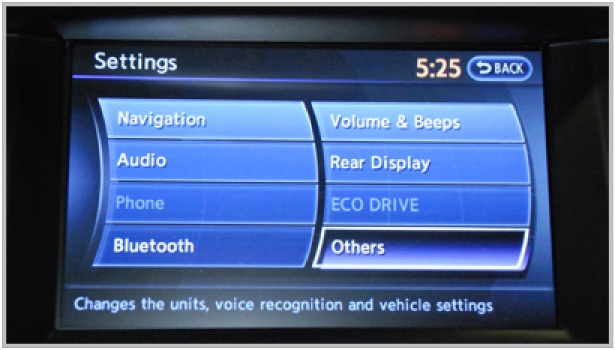
Comfort Settings
Vehicles equipped with Infiniti navigation can be customized to individual preferences. To adjust settings, select the "Others" key using the Infiniti controller and then select the items to adjust. Customers can also select the status and operating conditions of the following listed items, by highlighting their desired selection through the Vehicle Settings in the vehicle information display and then pressing the ENTER button.
Auto Interior Illumination:
Can be used to alternately turn ON or turn OFF the illumination of the interior lights when any door is unlocked.
Light Sensitivity:
Can be used to adjust the sensitivity of the automatic headlights higher (right) or lower (left).
Light Off Delay:
Can be used to change the duration of the automatic headlight off timer from 0-, 30-, 45-, 60-, 90-, 120-, 150- and 180-second periods.
Selective Door Unlock:
When this item is turned ON, only the driver’s door is unlocked first. All the doors can be unlocked if the door unlock operation is performed again within one minute. When this item is turned to OFF, all the doors will be unlocked after the door unlock operation is performed once.
Intelligent Key Lock / Unlock:
Can be used to alternately turn ON or turn OFF the door lock/unlock function by pushing the door handle request switch.
Return All Settings to Default:
This key will change all comfort systems back to the default setting.
Lift Steering Wheel on Exit (If Equipped with the Premium Package):
Can be used to turn ON or turn OFF the steering wheel moving upward for easy exit when the ignition switch is in the OFF position and the driver’s door is opened.
Slide Driver Seat Back on Exit (If Equipped with the Premium Package):
Can be used to turn ON or turn OFF the driver’s seat moving backward for easy exit when the ignition switch is in the OFF position and the driver’s door is opened.
Note: To adjust settings for Lift Steering Wheel on Exit, or Slide Driver's Seat on Exit use the steering wheel controls and the Vehicle Information display menu.
Note: If the battery cable is disconnected, all settings will return to default.
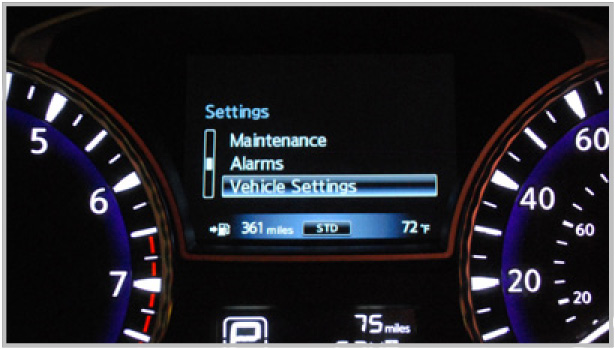
Use the Settings menu in the vehicle information display to change operating conditions.
Enhanced Auto Headlights

Many states now require headlights be illuminated in rainy conditions. The new JX has another automatic-on headlight function that illuminates the headlights during rain.
System Features
The auto headlight system includes a more sensitive light sensor to ensure that headlights are turned ON at twilight.
To avoid unnecessary triggering in tree shade but secure immediate triggering at tunnel entrances, software was developed creating a smarter on-off system that responds precisely to various lighting situations.
The Infiniti JX has adopted an improved two-stage automatic-on headlight function:
Stage 1
In lower light situations during the day, the headlights illuminate automatically, but the interior gauges remain in daytime mode.
Stage 2
In late evening/night conditions, the headlights illuminate and the interior gauges revert to nighttime lighting.
Wipers Equipped With Rain Sensor
To help improve visibility in rain, the JX headlights are automatically turned ON when the windshield wipers are activated (after four swipes of the wiper). Rain sensitivity can be adjusted through the Vehicle Settings in the vehicle information display.
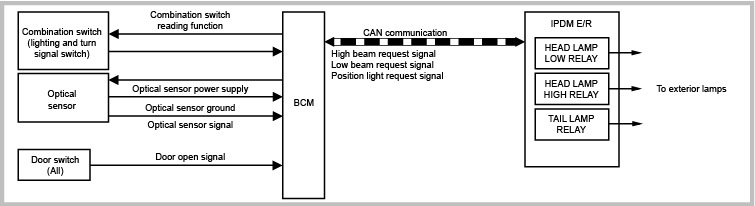
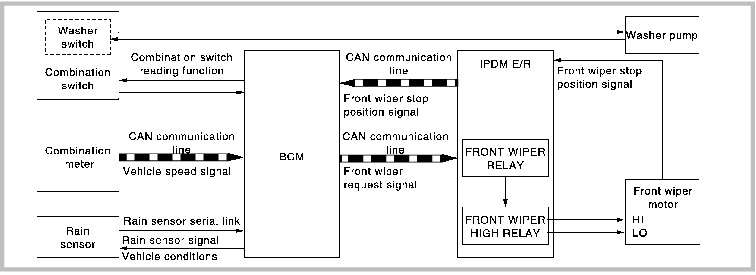
Rain level and sensor conditions are detected by the rain sensor. The rain sensor detects water droplets on the windshield with infrared rays and transmits the rain sensor signal to BCM via the rain sensor serial link.
- The BCM transmits the vehicle conditions (vehicle speed, front wiper condition, rain sensor sensitivity setting, etc) to the rain sensor via the rain sensor serial link.
- The rain sensor judges a wiping speed for front wiper by the rain condition and the vehicle conditions and then transmits the wiping speed request signal to the BCM via the rain sensor serial link.
Auto Wiping Operation
The front wiper is controlled by the following functions of BCM and IPDM E/R:
- The BCM receives the wiping speed request signal from the rain sensor via the rain sensor serial link.
- The BCM controls the front wiper operation according to the wiping speed request signals. Then it transmits the front wiper request signals (LO or HI) to the IPDM E/R via CAN communication line.
Note: The default factory setting of the front wiper AUTO operation is linked with the operation of the rain sensor. You can set the front wiper AUTO operation to “Operation linked” or “Not linked” with the rain sensor with CONSULT to perform maintenance or repairs.
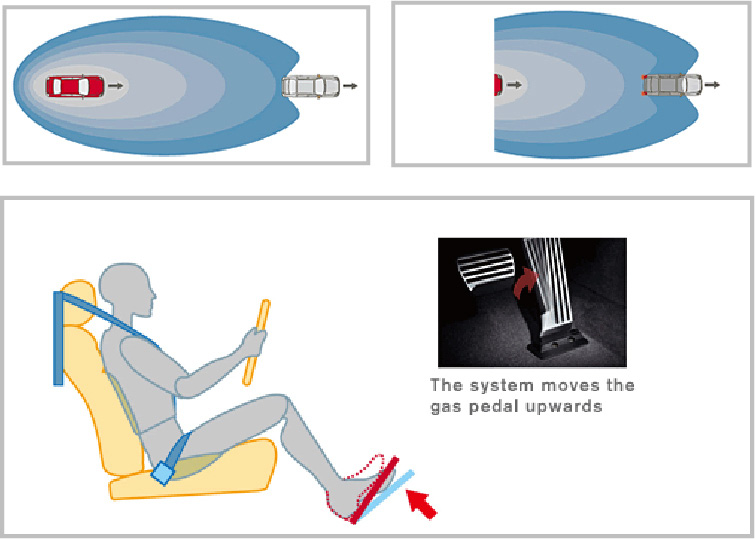
Distance Control Assist System
The Infiniti JX vehicle’s Distance Control Assist (DCA) system helps drivers control the distance between themselves and the vehicle in front. DCA is intended to assist drivers in releasing the throttle and applying the brakes as needed to control the distance between themselves and the vehicle in front.
By using a radar sensor installed in the front bumper, the system follows the distance and relative vehicle speed of both cars.
The system consists of a new radar sensor with the main controller located behind the front bumper, brake actuator, accelerator pedal actuator, brake actuator controller, audible buzzer, instrument cluster indicator and a control switch.
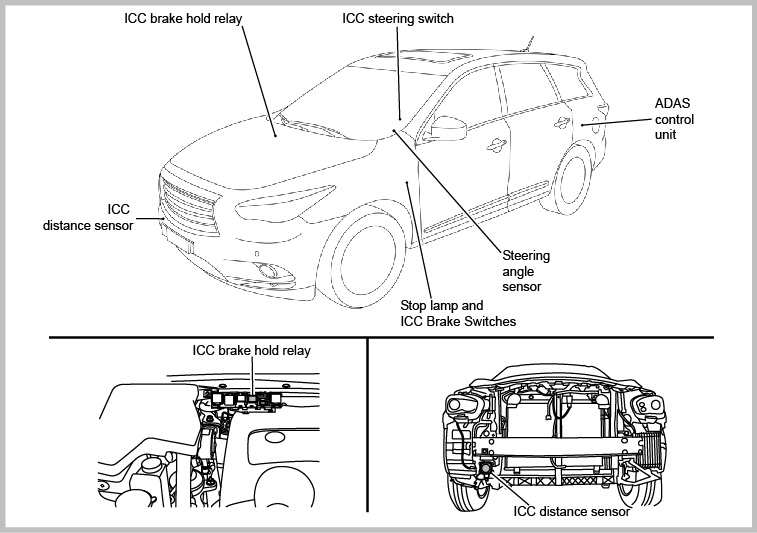
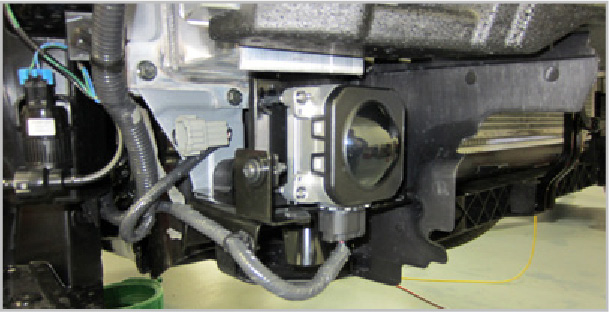
ICC Distance Sensor
The ICC distance sensor is installed on the back of the front bumper and detects a vehicle ahead by using millimeter radar waves.
Operation
- The ICC Distance Sensor detects radar reflected from a vehicle ahead and calculates the distance from the vehicle ahead and its relative speed, based on the detected signal.
- The ICC Distance Sensor transmits the presence/absence of a vehicle ahead and the distance from the vehicle to ADAS control unit via ITS communication.
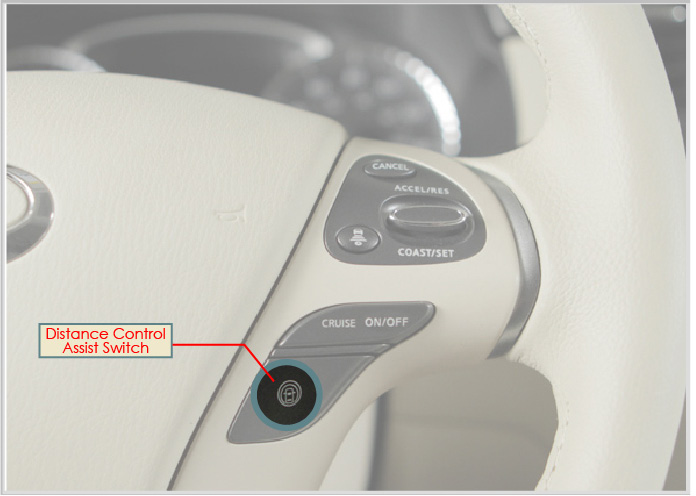
Distance Control Assist is available at the touch of the control switch button to assist the driver in managing the distance to the vehicle traveling ahead. The DCA system utilizes the accelerator pedal to provide feedback to the driver. When approaching the preceding vehicle from behind to help maintain a safe distance, DCA signals the driver that the throttle should be released by “pushing back” via the accelerator pedal, as a gentle reminder to maintain a more appropriate distance. If the driver continues closing in on the vehicle ahead, a more insistent double impulse from the pedal plus an audible signal will urge the driver to release the throttle immediately. Upon release of the throttle, DCA will automatically engage the brakes and decelerate the vehicle in order to help reestablish a safe distance. In slowing traffic, DCA will bring the vehicle to a complete stop while allowing the driver to override the system at any time by depressing the accelerator pedal or brake.
The system works using two modes: when the car is getting close to the preceding vehicle and when the preceding vehicle is decelerating and the driver is required to apply the brakes.
The ADAS control unit calculates a target distance between vehicles and a target speed, based on signals received from each sensor and switch. Then the control unit transmits an engine torque command value to the ECM and a brake fluid pressure control signal to the ABS actuator and electric unit (control unit) via CAN communication.
- ADAS control unit then transmits a buzzer output signal and meter display signal to the combination meter via CAN communication.
If the vehicle is getting close to the preceding vehicle and the driver releases the gas pedal, the system automatically applies the brakes smoothly to decelerate the vehicle and help the driver maintain an appropriate following distance. If the driver is pressing the gas pedal, the gas pedal actuator moves the gas pedal upwards to assist the driver to release. The system applies the brakes only when the driver is not pressing the gas pedal.