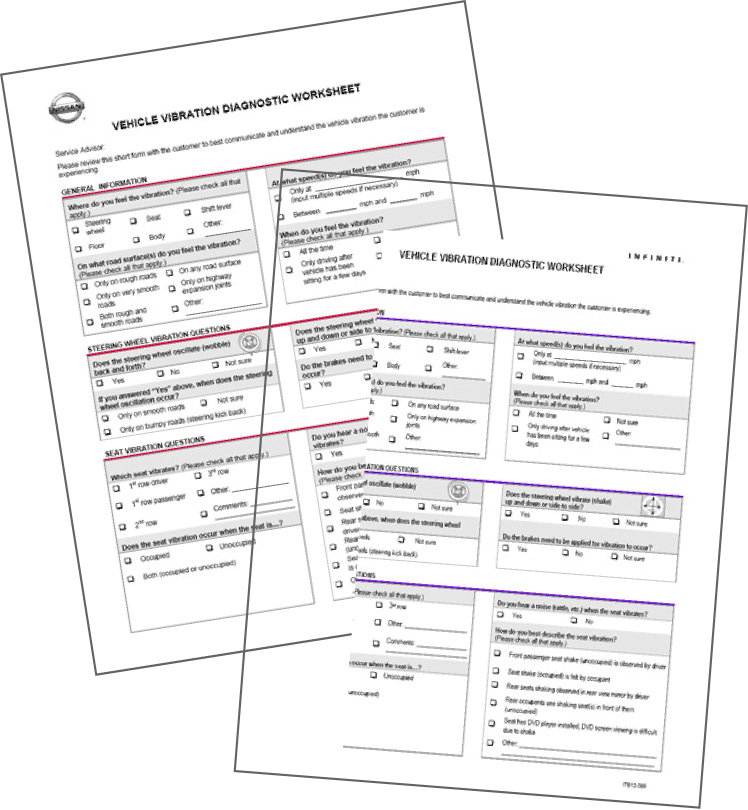
Vehicle Vibration Customer Diagnostic Worksheet
Service Advisors can print the Vehicle Vibration Customer Diagnostic Worksheet to help gather and document information about a customer’s vehicle vibration concern. Indicating the vibration concerns by the categories on the worksheet will make it easier to communicate these issues to the technician.
For a printable Vibration Diagnostic Worksheet click on either Infiniti or Nissan buttons:
![]()
![]()
Note: When completed, attach the Vehicle Vibration Customer Diagnostic Worksheet to the Work Order.
DIAGNOSIS and ROAD TEST PROCEDURES
Vibrations may be caused by multiple sources, such as wheels over a rough road, steering, or suspension issues. When a rotating component is not balanced, the imbalance causes additional centrifugal force to develop, possibly causing an abnormal vibration. To start investigation, refer to the Vehicle Vibration Customer Diagnostic Worksheet, before performing a road test of a customer’s vehicle. You can learn a lot by performing an Acceleration Test, Neutral Coast-Down, Downshift and Neutral Run-Up Tests. When performed together, you can isolate and determine if the vibration relates to vehicle speed (MPH) or engine speed (RPM) and to locate the components causing vibration
Acceleration Test
1. On a smooth, level road, accelerate to the MPH at which the vibration is most noticeable.
2. Determine if the vibration matches the customer’s description.
3. Note the MPH, RPM and gear or Mode in which the vibration is felt. Use an Electronic Vibration Analyzer (EVA) or Sirometer to determine the vibration’s frequency during the road test.
Neutral Coast-Down Test
1. Accelerate to a speed slightly higher than the speed at which the vibration is most noticeable.
2. Shift the transmission into NEUTRAL and allow the vehicle to “coast down” below the speed at which the vibration was first noticed.
3. If the vibration occurs at the same MPH as before while operating in NEUTRAL, the problem is related to vehicle speed.
4. This test will help eliminate the engine and torque converter as a possible cause. Continue testing to pinpoint the cause to wheels/tires or driveline components.
Downshift Test
1. Accelerate again to the vehicle speed at which the vibration is most noticeable. Note the RPM associated with the vibration.
2. Decelerate about 5-10 MPH, and then DOWNSHIFT to the next lower gear.
3. While in this lower gear, accelerate to the RPM noted in step 1. Hold that RPM long enough to determine if the vibration is as severe as before.
4. If the vibration is as severe, the engine or torque converter is the most probable cause.
Neutral Run-Up Test
1. To verify vibrations related to RPM, make sure the vehicle is stopped, and place the transmission in PARK or NEUTRAL (engine running).
2. Slowly increase the RPM while paying attention to the vibration.
3. Note the RPM at which the vibration is most noticeable.
4. If the vibration occurs with the vehicle stopped, the problem is not caused by wheels/tires or driveline components. Use the EVA or Sirometer tools to help determine if the possible cause is related to combustion or imbalance.
5. In some cases it may be necessary to perform a brake torque test to verify a peculiar vibration and identify its source.
Brake Torque Test (Stall Test)
This test can be used on vehicles equipped with automatic transmissions to isolate vibrations not detected by the Neutral Run-Up Test. Vibrations affected by engine load or torque may also be isolated by this test.
1. Chock the front wheels.
2. With the engine running, and both the parking brake and service brakes applied, place the transmission in DRIVE.
3. Slowly increase the RPM while paying particular attention to vibrations that match the customer’s description.
4. Note the RPM at which the vibration is most noticeable.
5. Low RPM vibrations detected during this test are usually associated with engine mounts or exhaust system problems.

Steering Input Test
This test determines whether wheel bearings or suspension components are causing a vibration.
1. While driving at the speed where the vibration is most apparent, pay attention to changes in severity while steering to the left, then right.
2. If the vibration becomes more severe or goes away entirely, look for
- Faulty wheel bearings
- Excessive tire tread wear
- Signs of damage to axle hubs
Service Tip:
- Vibrations caused by wheels and tires generally have a frequency less than 20 Hz. Customers often describe them in relation to vehicle speed.
- Vibrations caused by engine components generally have frequencies greater than 20 Hz. Customers often describe them in relation to engine speed.
Isolating Wheel and Tire Vibrations
If you can focus on a vibrating component (low frequency), the vibration is probably caused by wheels or tires. Steering wheel shimmy (side-to-side movement of the steering wheel), is always caused by tire/wheel imbalance.
Vehicle shake (up and down movement of the steering wheel) can occur with balanced, non-factory tires and wheels. Tire shake and shimmy will vary with changes in vehicle speed. It is possible for tire shake to occur ONLY during braking. First-order tire/wheel vibrations usually produce a vibration frequency of 10-20 Hz.
Service Tip: Always follow torque specifications for engine mounts.
Always use the new Vibration Diagnostic Worksheets to help with documenting and communication. They are good tools that should help get you on the road to repairing a customer’s vehicle right-the-first-time.