If one of your customers is describing an AV system concern, the diagnosis procedure you will want to perform on the vehicle is determined by how it is equipped. AV units have an on-board self-diagnosis mode for conducting trouble diagnosis automatically and a confirmation / adjustment mode for manually conducting system diagnosis. These functions can help get you started to analyze and confirm symptoms described by the customer. It can help you to verify the relation between the symptom and a condition. When a symptom is detected, connect the CONSULT and CONSULT-III Plus, and then perform “Self-Diagnosis” by symptom to help identify the possible root cause of the AV system concern.
- The self-diagnosis mode performs diagnosis of the AV control unit and across the connections between system components and the antenna. The vehicle will then show you the diagnosis results on its display.
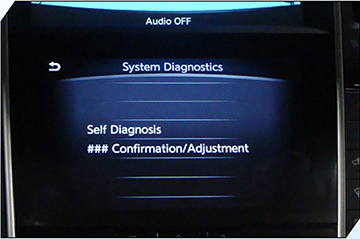
- The confirmation/adjustment mode allows you to check, modify or adjust the vehicle signals and set values as well as to monitor the system error records and system communication status. The audio unit “Confirmation/Adjustment” mode is used to perform trouble diagnosis that requires operation and judgment by an operator. This function diagnoses trouble that cannot be automatically judged by the system, such as checking/changing the set value and displaying the error history of the AV control unit.
Depending on how the vehicle is equipped, the system can also perform: AV monitor display diagnosis through the color spectrum bar, gradation bar, touch panel for calibration, response checks and white display menus. On vehicles equipped with a rear camera, the rear view camera display guide lines can also be adjusted. For complete information on what is available for the system you are working on, refer to the applicable Electronic Service Manual (ESM) AV section under Description for the specific system.
Starting Self-diagnosis
The method of starting the on-board self-diagnosis differs between vehicles and their equipment. The controls for AV units with base audio systems, vehicles with display audio (with or without Bose®), vehicles equipped with AV units when operation of Navigation and audio systems are integrated, or units without Navigation require various controls.
Base Audio
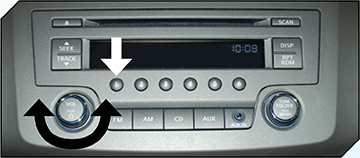
1. Turn the ignition switch to the ON position.
2. Turn the audio unit OFF.
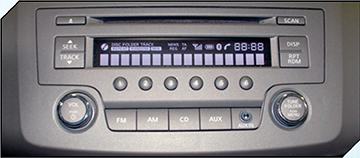
3. While pressing the preset 1 button, turn the volume control dial clockwise or counterclockwise 30 clicks or more. When the self-diagnosis mode is started, all the display segments will be illuminated.
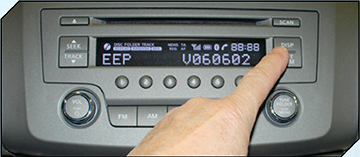
4. Press the DISP button to check the hardware version, EEPROM version and EQ pin info.
5. Hold down the DISP button to return to the all display segments screen.
6. Press the RPT/RDM button to perform speaker channel checks.
7. Use the DISP button to display M-CAN message transmission and communication history and return to the diagnosis mode screen.
8. To exit hardware/software versions and speaker channel check, turn the ignition OFF.
Bose® Audio with Color Display
1. Start the engine.
2. Turn the audio system OFF.
3. While pressing the SETTING button, turn the volume control knob clockwise or counterclockwise 40 clicks or more. When self-diagnosis mode begins, a short beep will be heard.
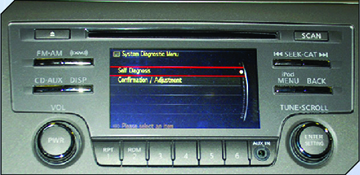
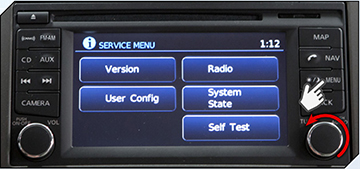
4. The self-diagnosis initial screen is displayed, and then the items of “Self Diagnosis” and “Confirmation/Adjustment” can be selected.
5. To exit self-diagnosis mode, or return to a previous screen, press the BACK button until you are out of self-diagnosis or turn OFF the ignition.
Bose® Audio with Navigation
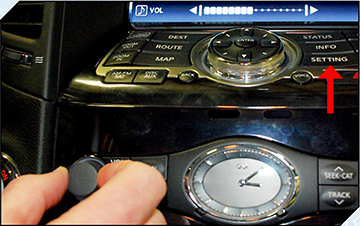
1. Start the engine.
2. Turn the audio system OFF.
3. While pressing the SETTING button, turn the volume control dial clockwise or counterclockwise 40 clicks or more. When the self-diagnosis mode begins, a short beep will be heard. Shifting from current screen to previous screen is performed by pressing the BACK button.
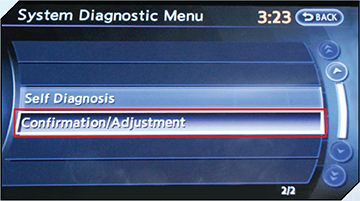
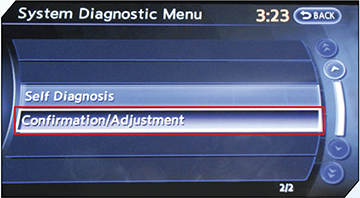
4. The trouble diagnosis initial screen is displayed, and then the items of “Self Diagnosis” and “Confirmation/Adjustment” can be selected.
Self-diagnosis
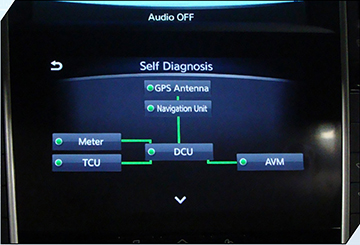
1. Start the self-diagnosis function and select “Self Diagnosis.”
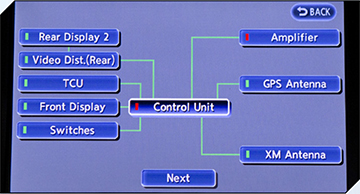
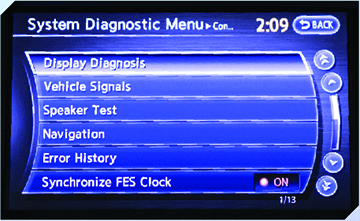
2. Diagnosis results are displayed after the self-diagnosis is completed. The unit names and the connection lines are color-coded according to the diagnostic results.
NOTE:
Perform diagnosis with CONSULT with C-III Plus if the on-board diagnosis does not start or if the screen does not display anything, etc.
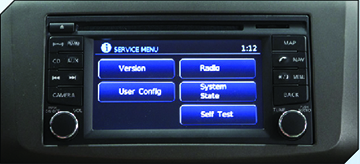
CONFIRMATION/ADJUSTMENT MODE
1. Start the diagnosis function and select “Confirmation/Adjustment.” The confirmation/adjustment mode indicates where each item can be checked or adjusted.
2. Select each switch on the “Confirmation/Adjustment” screen to display the relevant trouble diagnosis screen. Press the RETURN switch to return to the initial “Confirmation/Adjustment” screen.
3. Self-diagnosis mode is canceled when the ignition switch is turned OFF.
To Enter Self-diagnosis on a LCN2 Radio
For the LCN2 radio diagnosis, we will use the 2014 Sentra®. Most operate the same, but always consult the ESM for your vehicle.
1. Turn the ignition switch to ON or ACC position.
2. Turn the audio unit OFF.
3. While pressing the MENU button, turn the TUNE-SCROLL control dial counterclockwise three clicks or more, then clockwise three clicks or more, then back counterclockwise three or more clicks.
4. When a short beep is heard, the radio enters self-diagnosis mode.
Gen V On-board Diagnosis
The Q50™ has a self-diagnosis mode for conducting trouble diagnosis automatically and a confirmation/adjustment mode for manual adjustment.
The self-diagnosis mode performs diagnoses on the display control unit and connections between system components. Then it displays the diagnosis results on the display.
The confirmation/adjustment mode allows the technician to check, modify or adjust the vehicle signals and set values as well as to monitor the system error records and system communication status since the system cannot make automatic judgments.

On-board Diagnosis Mode Description Self-diagnosis
- Displays control unit diagnosis.
- Diagnoses the connections across system components.
Method of Starting
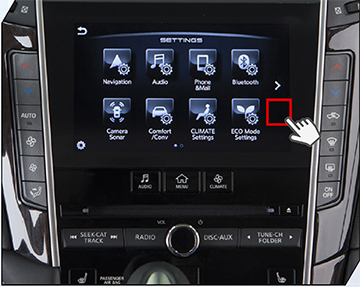
1. Start the engine.
2. Turn the audio system OFF.
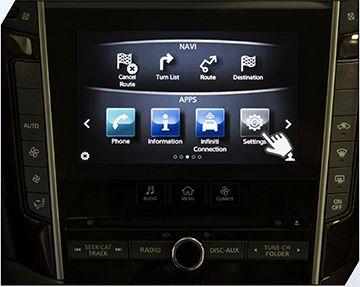
3. Touch the “SETTINGS” icon and display the settings menu screen.
4. Press the SEEK•CAT/TRACK switch at least 3 times (within 15 seconds after the settings menu screen display).
NOTE:
If you press the SEEK•CAT/TRACK switch more than 4 times, the self-diagnosis mode will not start. When the trouble diagnosis initial screen is not displayed, press the MENU switch again, and then restart the procedure at Step 3.
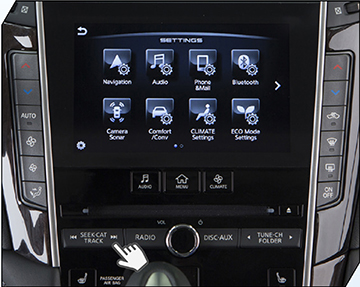
5. Touch the screen (area of the figure) for 3 seconds.
6. The trouble diagnosis initial screen is displayed, and then the items of “Self Diagnosis” and “Confirmation/Adjustment” can be selected.