The new Murano’s interior has been built with premium materials and high standards of fit specification. If it becomes necessary to install accessories or make repairs on the vehicle, refer to these quick tips so that you are aware of the differences of some finishers from previous models. Pay special attention to the fastening and release points when removing or reinstalling finisher parts; this will help you avoid breaking clips or damaging or marring surfaces.
FRONT DOOR FINISHER REMOVAL
Removing the front door finisher on a 2015 Murano is a little different than on previous models. To remove the front door finisher, the tools you will need are: a small finesse trim tool, a small flat-head screwdriver, and a 1/4” drive ratchet with 6-8” or longer extension and 10 mm socket.
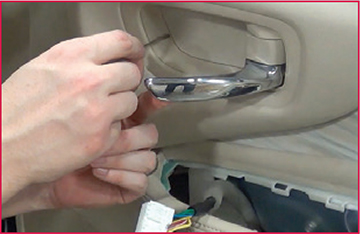
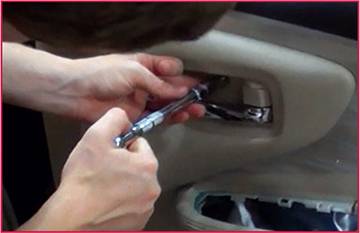
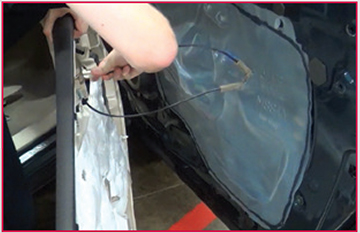
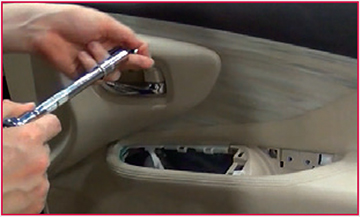
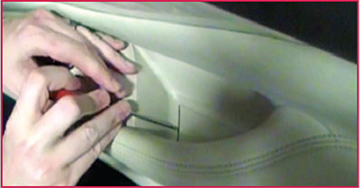
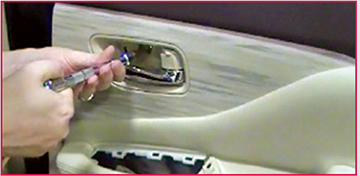
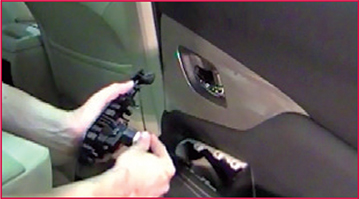
The first step is to remove the power window and door lock/unlock switch finisher. On previous models, you would insert the finesse trim tool at the back of the switch finisher. On the 2015 Murano, you will need to insert the tool from the side. This will help keep you from scratching the finisher. Using the finesse tool, insert it under the edge at the side near the rear switch finisher. Lift up the edge at the corner while twisting and prying upward with the trim tool. When it is lifted up enough, you will be able to grasp the corner with your other hand and then lift the power window switch finisher up and out.

NOTE:
While online, you can click on the video icons to view the finisher removal and installation procedures.
Remove the power window switch by disconnecting the connectors for the door lock/unlock switch and the door mirror remote control switch.
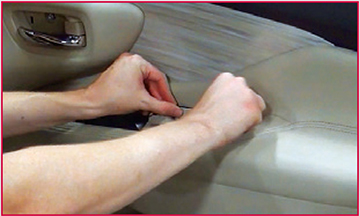
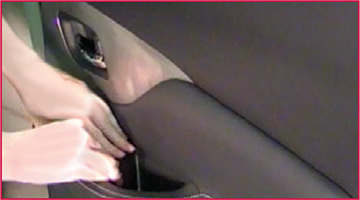
The next step is to remove the pull/cup cover and the inner pull handle cover.
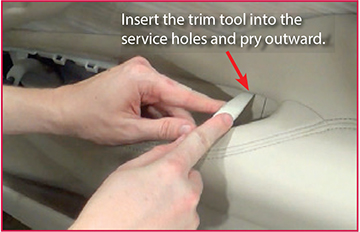
To remove the pull/cup cover, access the two service holes, one at each end. Insert a trim tool into the first hole, and then pry outward. Then, insert the trim tool into the second service hole and pop off the pull/cup cover by prying with the trim tool.
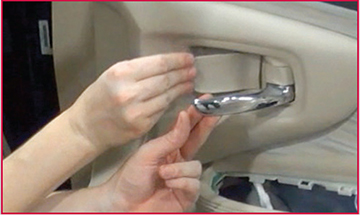
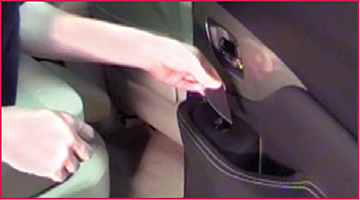
Removing the inner pull handle cover is just like removing one from the 2015 Altima®.
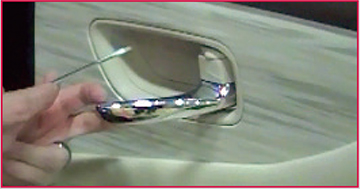
Pull out the door handle. Carefully insert a flat-head (or flat-blade) pocket screwdriver or similar tool into the front edge of the door handle cover. Then, carefully pry to pop out the door handle cover.
Then, remove the three bolts using a 1/4” drive ratchet with 6-8” or longer extension and 10 mm socket.
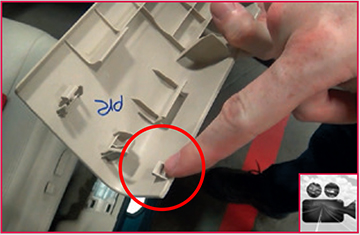
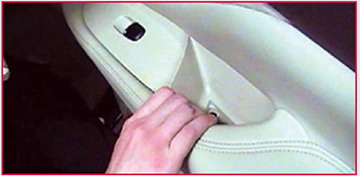
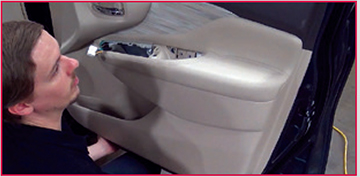
This next step of removing the door finisher is a little different than previous models. To remove the door finisher, grab it from the bottom and begin pulling outward to release all the clips as on previous models.
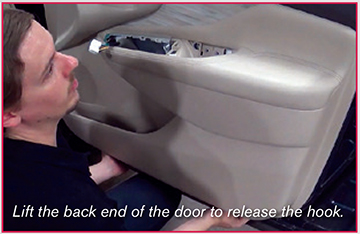
The difference on the 2015 Murano front door finisher is that you will need to lift the back end of the door panel first to release the hook. Then rotate the back end up and away to remove the front door finisher.
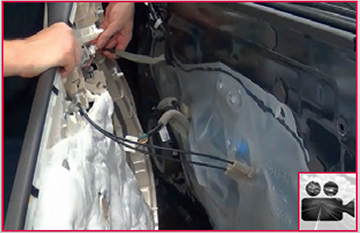
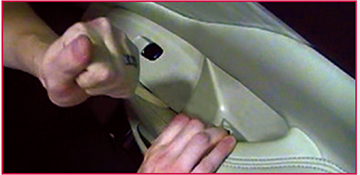
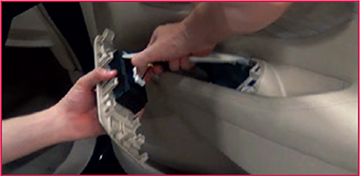
Next, like on other models, access the inside of the door finisher by pulling outward. Release the door lock cable and inside door handle cable. Disconnect the door light harness connector.
FRONT DOOR FINISHER INSTALLATION
Installing the front door finisher on the 2015 Murano is essentially the reverse of removing the door finisher.
Similar to other models, attach the door lock cable and inside door handle cable. Connect the door light harness connector
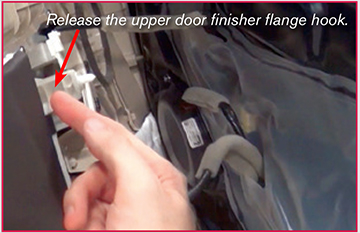
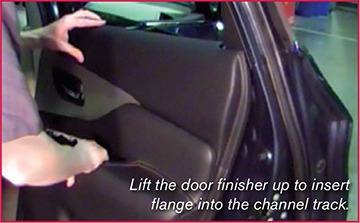
When installing the 2015 Murano door finisher, you will need to lift the back end of the door finisher to properly align it. Line up the hook to the channel track by lifting the rear of the door finisher. Make sure you insert the hook, and then lower the rear of the door finisher.
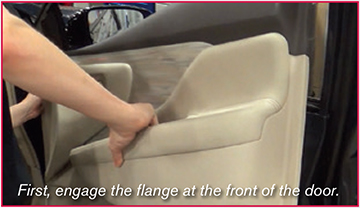
To do this, rotate the back end of the door finisher up, align the flange into the track, rotate the flange hook down and then slide it forward.
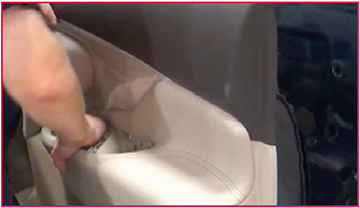
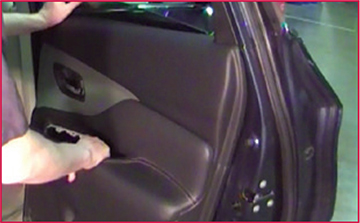
Pulling the door finisher forward slightly from the back will help you to align the clips to the door panel. Begin pressing on the door finisher on top of the clips, starting at the top of the finisher. Continue from the top to the bottom pressing the clips securely into their front door body panel mounting holes working rearward.
NOTE:
It is a good idea to check all around the door finisher once more pressing in the clips to eliminate any gaps.
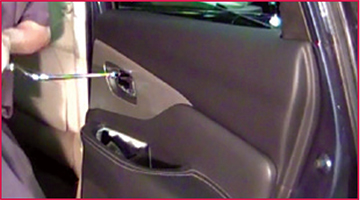
Before proceeding, make sure you can still access the door switch harness connector.
The next step is to reinstall the three bolts.
Reinstall the pull/cup cover and the inner handle cover.
The pull/cup cover easily snaps into position.
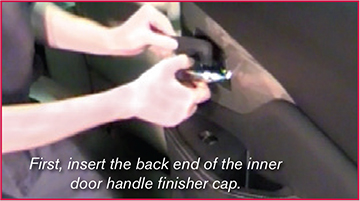
Install the inner handle finisher. Pull out the handle. Insert the inner handle finisher’s back end first. Snap it in place by pressing it into position.
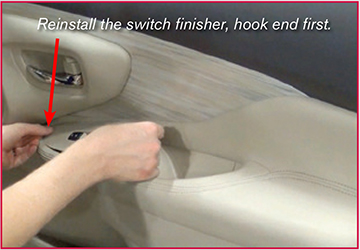
Connect the door switch harness connector to the door switch. Position the door switch in place, hook end first.
Press down along the finisher to snap it into place.
NOTE:
When the main power window and door lock/unlock switch has been disconnected, it is necessary to perform the initialization for normal operation of the power window system.
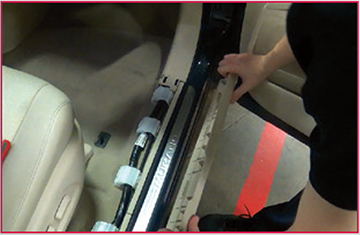
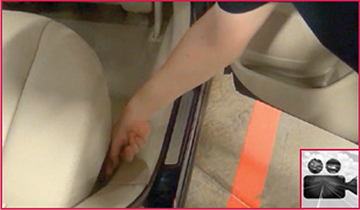
FRONT KICKING PLATE REMOVAL
Removing the front kicking plate from the 2015 Murano is very similar to that of the Altima or Rogue®.
At each inner, front and back corner, the plate is attached with hooks that lock into the bottom of the center pillar lower finisher and at the front lower pillar finisher on the IP side.
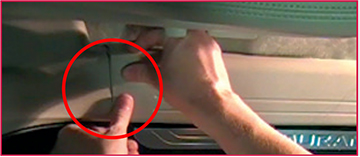
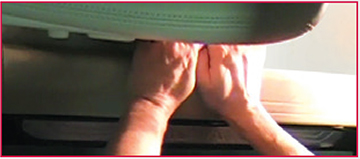
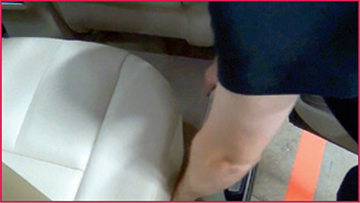
Get your hands in and grasp the kicking plate at the corners. Insert your fingers up under the corners and pull them outward and lift them up to release the clips. Release them one at a time. You should hear them pop out when they release. Then, just pull up on the kicking plate and rotate it out.
![]()
DO NOT attempt to remove the kicking plate before releasing the inner pawls. Pulling up on the kicking plate by the end WITHOUT first releasing the inner pawls will most likely break the hooks OFF.
FRONT KICKING PLATE INSTALLATION
To reinstall the front kicking plate on the 2015 Murano, position the front kicking plate so the datum is at the rear.

Position the front kicking plate to align it so you can press in the clips at the datum on the center pillar lower finisher.
Push in the first pawls near the end.
Continue pressing the pawls along the kicking plate securely into their mounting holes.
DASH SIDE FINISHER TRIM REMOVAL
To remove the lower front dash side finishers, start by removing the front kicking plate.
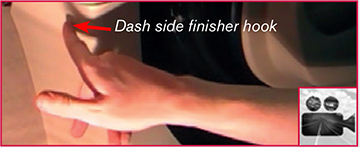
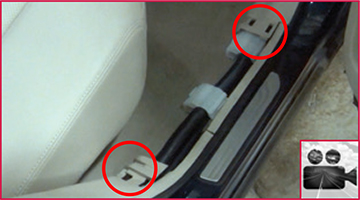
The finishers have two hooks, as can be seen in the images on the right.
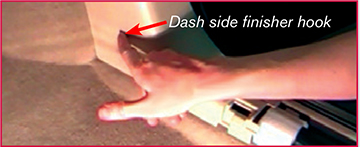
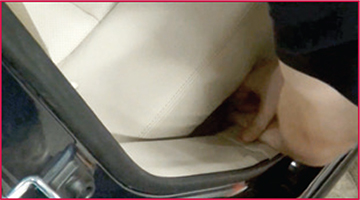
Release the metal clips by getting your hand up under the lower inside corner and lift it up to about midway.
Then, with both hands, grasp the finisher by the edge at the middle and pull it straight outward.
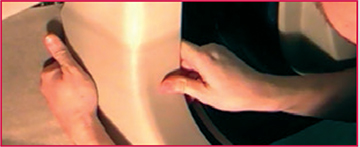
Then, release the upper pawl by pulling outward and back to remove the finisher.
DASH SIDE FINISHER TRIM INSTALLATION
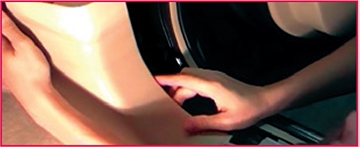
To install the dash side finisher trim, you need to be careful as it is a blind install. There are two mounting holes that line up with the lower and upper mounting pawl clips, and you will not be able to see these as you position the finisher for installation.
Position the finisher until you feel the top clip go into the hole, and press it into place. Then, press it to secure the lower clip.
NOTE:
When installing the dash side finisher, ensure that the metal clips are securely placed into the body panel holes.
REAR DOOR FINISHER REMOVAL
Removing the rear door finisher on the 2015 Murano is very similar to removing other rear door finishers. First, there are three covers that need to be removed: the inside handle cover, pull/cup cover, and switch finisher.
To remove the inner handle cover cap on the rear door, pull the handle out and then insert a small flat-head screwdriver under the finisher’s front edge as shown. All you really need to do is push the flat-head screwdriver in, and the cover will pop right out.
The next step is to remove the pull/cup cover. To remove this finisher you will need to insert a flat-head screwdriver or a trim tool into the front edge of the pull/cup cover. Twist the tool, and the cover will pop right out.
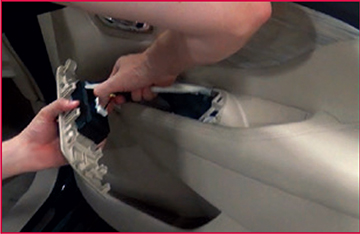
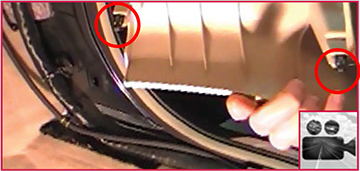
Removing the rear door switch finisher assembly is a little different on the 2015 Murano than on previous models. To remove the rear door switch finisher, you will need to insert the tool from the side in order to help keep from scratching the finisher. Pull outward a little on the arm rest at the pull cup to create a gap so you can insert the finesse tool up under the side near the rear edge of the switch finisher. Insert the tool, and lift up underneath the edge. Continue lifting up the corner, and when it is lifted up enough, grasp the corner with your other hand to lift the end of the switch finisher upward.
Turn the finisher over and disconnect the switch connector.
The next step is to remove the inside handle cover and the pull/cup cover.
Use the ratchet, extension and 10 mm socket to remove the two bolts holding the finisher on at the inner handle cover and the pull/cup cover.
Now, remove the door panel by grabbing it from the bottom and pulling it outward. Continue moving your hands up under the finisher and pull outward to release the clips. Then, lift the door finisher up off the channel track.
Pull the door finisher outward so you can reach in behind and release the door handle hooks.
REAR DOOR FINISHER INSTALLATION
Installing the rear door finisher on the 2015 Murano is essentially the reverse of removing the rear door finisher
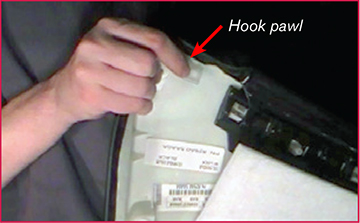
On the 2015 Murano rear door finisher, there is a hook pawl at the rear corner of the finisher that you have to install into its mounting hole. It will hook into the slot at the top of the door panel that is next to the channel track.
Similar to other rear doors, start by attaching the inner handle hooks to the door handle.
With this door, you need to lift the door finisher up and make sure that the hook pawl at the front of the door is the first thing that goes into the channel track. Make sure you can still reach and pull up the door switch harness connector through the door opening.
Rotate the back end of the door finisher up, tuck the pawl into the channel first and then press the finisher clips into their mounting holes.
Align the front door finisher, press the hook pawl into its mounting hole on the front of the door finisher and begin pressing in the clips.
Working from the top to the bottom, continue pressing the clips securely into their panel mounting holes working along the finisher
NOTE:
After pressing in all of the clips, check all around the finisher once more for any gaps.
Reinstall the two bolts that hold the finisher at the door handle inner cover and the pull/ cup handle cover.
To reinstall the switch finisher, first attach the connector and then install the finisher by hooking it in the front.
Press down along the switch finisher to snap it into place.
Reinstall the pull cup and inner door handle cover caps.
Both should easily snap into position.
The pull/cup cover finisher cap pops straight in from the top.
For the inner door handle finisher cap, pull out on the handle, insert the back end of the inner door handle finisher cap first and then just press it into position.
REAR KICKING PLATE REMOVAL
Removing the rear door kicking plate is similar to the front kicking plate. There are two clips, one at each inner, front and back corner of the kicking plate, that attach with hooks that lock into the bottom of the center pillar lower finisher and at the rear lower pillar finisher.
You will need to get your hands in and grasp the kicking plate at the corners to get your fingers up under the corners. Then, pull the corners out to release the clips. Release them one at a time. You should hear them pop out when they release.
After that, grasp under the inner edge at both ends and just lift up and rotate it out
![]()
DO NOT attempt to remove the kicking plate before releasing the inner pawls. Pulling up on the kicking plate by the end WITHOUT first releasing the inner pawls will most likely break the hooks OFF.
REAR KICKING PLATE INSTALLATION
To reinstall the rear kicking plate on the 2015 Murano, align the front end of the rear kicking plate to install at the datum points in the center lower pillar rear lower finishers.
Position the rear kicking plate and press it in at the datum holes on the center lower pillar.
Begin pressing the pawls along the kicking plate inner edge into their mounting holes. Push down at the pawl locations on the top and press in on the pawls on the rear side. It installs very easily.
Ensure that you secure the inner pawls at the ends of the kicking plate to make sure that the kicking plate engages flush to the lower finishers.
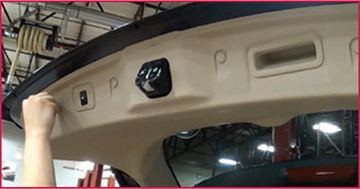
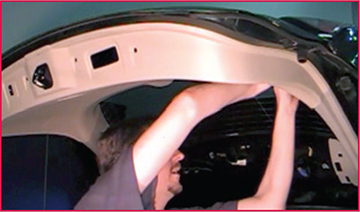
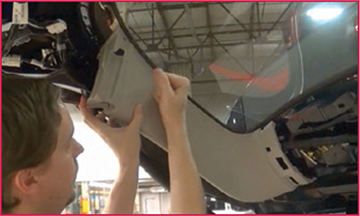
BACK DOOR TRIM REMOVAL
To remove the back door finisher, you will need to remove the upper and lower panels first before you remove the side panel finishers.
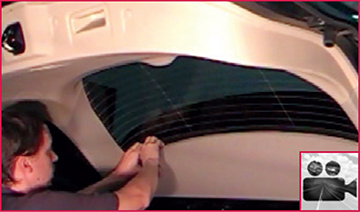
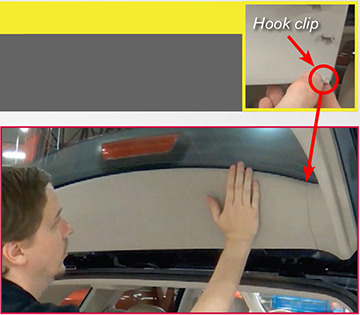
BACK DOOR UPPER PANEL
Starting with the upper panel, insert your fingers under the edge of the finisher at the corner and pull outward slightly to release the clip. Move your hands along the edge, continuing to pull outward releasing the clips as you go.
Finally, grasp the bottom of the upper trim panel to disengage it from the back door side panel.
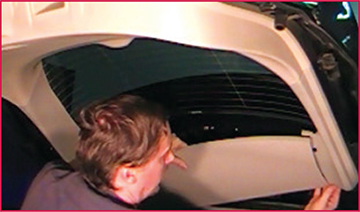
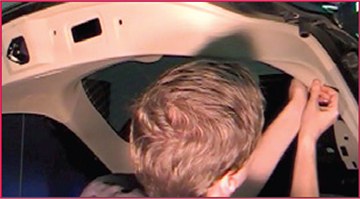
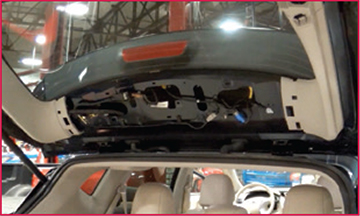
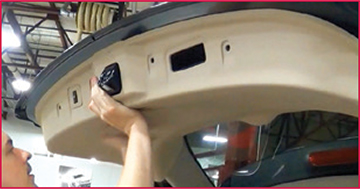
BACK DOOR LOWER PANEL
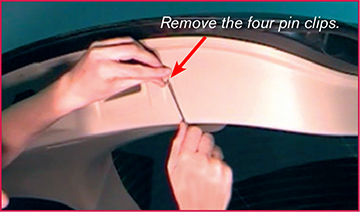
To remove the back door lower trim panel, first remove the four clips on the bottom and then the pull handle.
Insert a small flat-head screwdriver under the lip of a push pin clip and lift up to remove it. Continue the same action to remove the other three push pin clips.
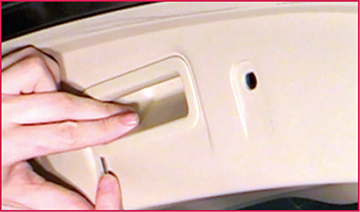
Next, insert the small flat-head screwdriver under the edge of the pull handle and pry up enough to grasp it with your hands and pull up and out.
There are clips all along the outside edge and the sides that hold the lower panel.
First, pull the lower back door panel ends away from where they hook into the back door side panels.
When those are released, start pulling the back door lower panel finisher down, starting at one end and working your way around the edge to release the inside and outside clips. Once the panel is released, turn the finisher and reach around and disconnect the back door automatic switch connector (if so equipped).
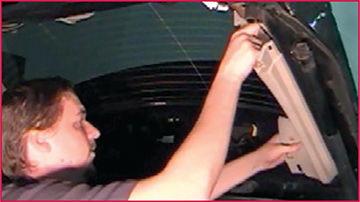
BACK DOOR SIDE PANEL
To remove the two back door side panels, grab them with your hands and pull them in toward the middle.
BACK DOOR TRIM FINISHER INSTALLATION
To reinstall the back door trim, you need to begin by first installing the side panels.
BACK DOOR SIDE PANEL
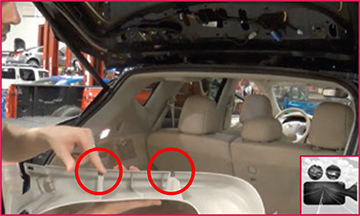
The side panels use two metal clips to secure into the body panel. Be aware that one side has a wire harness that runs along the door, which makes the installation a little difficult because it conceals the mounting holes. So, you will need to be extra careful when you attach that side panel.
Start by positioning the side panel until you feel that you have aligned the metal clips into the mounting holes.
Once you have aligned the side panel, press at both clip locations to secure it.
Next, you can put on either the lower back door finisher panel or the upper.

BACK DOOR UPPER PANEL
When installing the back door upper panel, DO NOT hook the front clips located on the upper corners to the side panel first; install the metal clip on one side first to avoid breaking the hooks.
Then, begin pressing in the upper door panel clips working your way along the finisher. Just push the clips in gently; it does not require much force.
BACK DOOR LOWER PANEL
To install the back door lower panel, first re-attach the connector for the automatic back door close switch (if so equipped).
Hold the finisher in position and align it to the door panel by sliding it over the latch and the back door switch, while also engaging the back door side panels.
Press in the clips all along the inside and outside of the back door lower finisher panel.
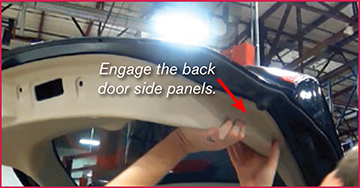
Make sure you engage the hooks into the back door side panels.
Next, position the pull handle and press it in.

Then, re-install the four push pin clips that hold the back door lower panel to finish the back door finisher installation.