As you have read in previous articles, wheel and tire assemblies can be the possible causes for many vibrations as well as problems. But now, we will shift our focus to brakes and how they can sometimes be the source of squeaks and squeals or clunks and groans, which are not music to the customers ears! Brake conditions may also be the source of vibration in a vehicle. We will start by defining our terms.
Most brake incidents fall into these three categories:
![]() Brake Noise Typically, this is a squeak, squeal, clunk, or groan that occurs when the brakes are applied or released.
Brake Noise Typically, this is a squeak, squeal, clunk, or groan that occurs when the brakes are applied or released.
![]() Brake Judder This is a vibration that can be felt in the vehicle, steering wheel, or brake pedal when the brakes are applied.
Brake Judder This is a vibration that can be felt in the vehicle, steering wheel, or brake pedal when the brakes are applied.
![]() Pedal Feel This is sometimes much more subtle than you may think when you are first pressed for an answer. In the customer’s opinion, either the brake pedal effort is too high or too low. The driver may feel that the brake pedal feels hard or soft. Some of our vehicles have new technologies, and the brake pedal may have a different feel. In these cases, it is likely a normal condition.
Pedal Feel This is sometimes much more subtle than you may think when you are first pressed for an answer. In the customer’s opinion, either the brake pedal effort is too high or too low. The driver may feel that the brake pedal feels hard or soft. Some of our vehicles have new technologies, and the brake pedal may have a different feel. In these cases, it is likely a normal condition.
All current Nissan vehicles are equipped at the factory with Nissan Original Equipment (OE) brake pads. The OE pads use a non-asbestos organic (NAO) compound. The NAO material provides state-of-the-art resistance to squeal noise. These pads are available as service parts and must be used if replacing brake pads under the terms of the Nissan New Car Warranty.
When replacing brake pads on a customer’s vehicle, it is important to select the type of pad that best meets the customer’s preference. Nissan offers two different types of replacement pads, Nissan Original Equipment and Nissan Key Value. Key Value brake pads are also available as a high-quality service replacement part. These pads use a semi-metallic compound similar to the material used in Nissan OE pads prior to the introduction of the NAO compound. Key Value semi-metallic pads offer excellent braking performance but do not offer the same level of noise resistance as the OE-NAO pads.
![]() Brake Noise
Brake Noise
Brakes can make a range of noises when applied or released. Some conditions (for example when the ABS/VDC system performs a self-check) can create noises that are normal and no repair action should be taken. Make sure the Service Advisor adequately explains the differences as customers have varying sensitivity to brake noise but brake noise symptoms may require repair procedures to help eliminate them.
Squeak noise when the brakes are cold:
This usually occurs during the first few stops in the morning. Generally speaking, this is regarded as a normal condition if the noise disappears after the brakes have warmed with application. If that is the case, no service action is necessary. As always, a quick check of ASIST will tell you if there is an applicable Technical Service Bulletin (TSB) written for this issue.
Squeak noise with the brakes at normal temperatures:
Over the years, we have published TSB’s to address this condition. Again, check ASIST first before proceeding. If a TSB does not exist for the car, use the information listed under Brake Service in this article and install Nissan Original Equipment brake pads.
Loud, continuous squeak/squeal noise:
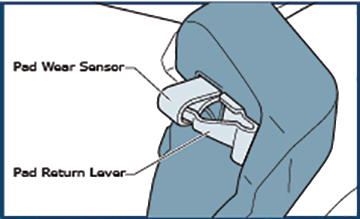
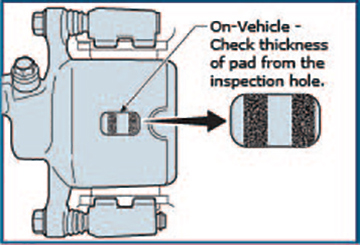
This can occur with or without braking. Genuine Nissan Brake Pads have a wear sensor that contacts the brake rotor once pads wear down to a particular thinness. When you hear this noise, check the pad thickness. You will probably find that the brake pads are worn out and need to be replaced. You should also check to make sure that the brake disc backing plate is not contacting the disc as this condition could also be the possible cause of a squeak/squeal noise. Refer to Brake Service in this article for additional information.

Groan noise when slightly releasing the brakes (after coming to a stop):
This is sometimes called “creep groan.” Just like cold brake squeak, this is generally regarded as a normal condition. But on some cars, there have been bulletins issued to address this. Check ASIST.
Groan noise during stopping:
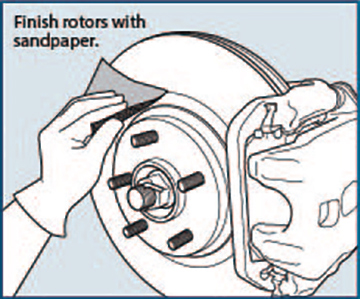
This is usually a result of heavy or frequent braking that causes a glazing of the rotor’s surface. Check ASIST to see if there is a Technical Service Bulletin specific to the vehicle model you are working on for this incident. Replace the brake pads then resurface the rotors and finish them with sandpaper. Hand finish the newly turned rotor surface with a nondirectional swirl pattern using #150 - 180 grit aluminum oxide sandpaper. This improves the rotor surface finish and helps to further reduce noise.
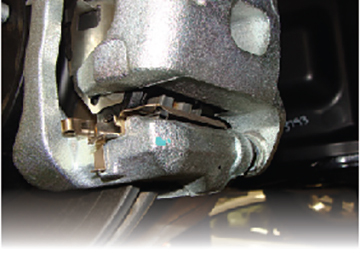
Single clunk noise from front suspension when applying the brakes:
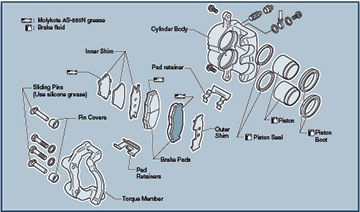
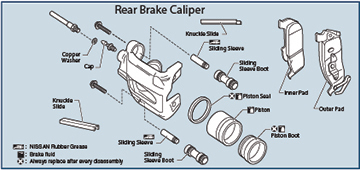
This can be duplicated by lightly touching the brake pedal. If the brake pedal is pushed hard, the noise is less likely to occur. The noise may be the result of brake pads shifting in the direction of rotor rotation when the brakes are applied. Make sure the brake pads and pad hardware (shims, springs, clips, etc.) are installed correctly. Correct installation and lubrication of brake pads and all caliper parts and hardware are essential for proper brake operation and will help dampen noise-causing movement and vibrations. Refer to Brake Service in this article for additional details.
NOTE:
- Apply MOLYKOTE® AS-880N grease or equivalent between the outer brake pad, outer shim cover and outer shim and between the inner shim and inner brake pad.
- Apply MOLYKOTE® 7439 grease or equivalent between brake pad retainers and brake pad ends.
Multiple clunk noises and pedal pulsation when first applying the brakes after starting the vehicle:
Anti-lock Brake System (ABS) Self-Check - On some vehicles, the ABS system performs a self-check when the brakes are applied after an initial start-up. Clunk noises may occur only once per ignition cycle (ignition OFF > ignition ON) and do not occur again until the ignition is cycled. These noises may happen even without applying the brakes on some models when the ABS self-check occurs the first time the car reaches 25 MPH after a cold start. The noise may be heard for a short duration (1-2 seconds) and may also be felt as a vibration through the floor. This is a normal condition. No service action is necessary if this is the case.
Rear brake squeal:
This may be due to accumulation of brake dust between the pads/shoes and rotors or drums. Clean all dust and dirt from the brake shoes, backing plates and related components. Make sure you use an appropriate air mask, a good quality breathing filter and a vacuum dust collector when you do this to minimize the hazard of airborne particles or other materials. Lubricate all sliding surfaces or brake shoe contact surfaces with Genuine Nissan Fluid silicone grease.
![]()
Since dust covering the front and rear brakes has an affect on the human body, the dust must be removed with a vacuum dust collector or wheel cleaner/brake dust remover product. Never splatter the dust with an air blow gun.
![]() Brake Judder
Brake Judder
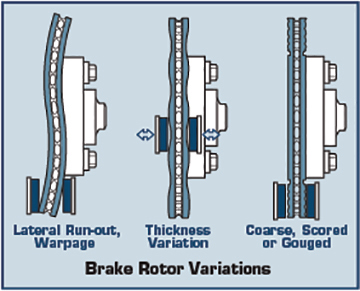
Brake judder is caused by rotor thickness variation. When the inner and outer surfaces of the rotor are not flat and parallel, the brake pads will have a tendency to travel in and out as they follow the low and high spots on the rotor during braking. This motion of the brake pads is transferred through the caliper pistons and can be felt in the brake pedal as a pulsation. In severe cases, it can also cause a back and forth oscillation in the steering wheel.
Rotor Run-out:
If the brake rotor is not true to the hub center, the brake pads contact one point on each side of the rotor with each wheel rotation even if the brakes are not applied. Over time, this point contact will cause the rotor to wear more in these areas and cause rotor thickness variation.
Brake Judder Repair
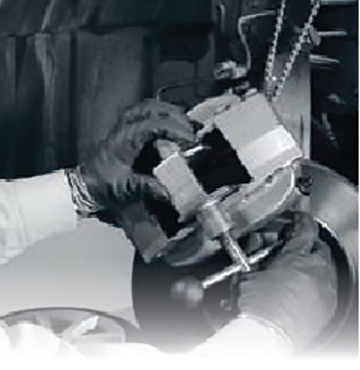
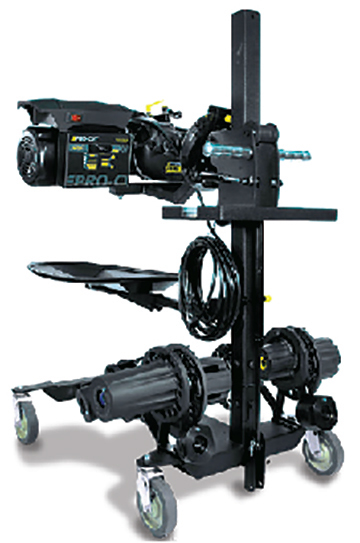
Brake judder incidents can be corrected by turning the rotors with the ProCut™ PFM Series oncar brake lathe. If the rotor must be removed for any reason, mark the exact location (rotor to axle hub) before removing the rotor. Refer to ASIST for related TSB’s or the applicable Service Manual for the vehicle you’re working on when using this lathe.
Vehicle Storage:
If the vehicle is not operated for periods of time, the area of the brake rotors not covered by the brake pads will rust. The frictional characteristics between the rusted and un-rusted areas of the rotor braking surface will be different. This difference may cause brake judder even after the rust wears off and at low and/or high mileage.
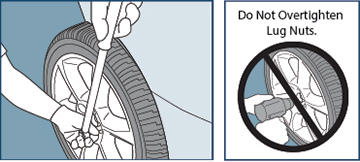
Lug nuts too tight (over torque):
Another possible cause of brake judder is lug nut over torque. This can happen if an air impact wrench is used to tighten the lug nuts. Uneven or high torque applied to the lug nuts may distort (warp) the brake rotor and hub. This may increase rotor run-out and cause excessive rotor thickness variation as the rotor wears.
IMPORTANT NOTE:
On some hoists, the vehicle may rock or wobble a little during the ProCut™ on-car brake lathe automatic compensation procedure. Use a jack or jack stand to firmly support the vehicle during the resurfacing process.
Make sure to prevent metal shavings from contacting or collecting on the ABS speed sensors.
![]() Pedal Feel
Pedal Feel
Some customers may indicate that the brake pedal feels too hard or too soft when applying the brakes. This could indicate that the brake system needs service or could be the result of the customer comparing the feel of the brakes in a new car with the feel of the brakes in his or her previous car. Road test the vehicle with the customer and determine if brake service is necessary. If so, refer to the appropriate ESM.
Brake Pedal Is Soft:
1. Inspect the brake calipers and determine if they are correctly installed and sliding freely.
2. Inspect the front and rear brakes and determine if the brake pads and shoes are properly installed.
3. Bleed all air from the brake system.
4. Make sure the brake pedal stroke and free play is adjusted correctly. Refer to the BR section of the appropriate Service Manual.
Brake Pedal Is Hard:
1. Burnish the brakes by driving the vehicle on a straight, smooth road at about 30 MPH (50 kph).
2. Use medium brake pedal effort to bring the vehicle to a complete stop from about 30 MPH (50 kph). Adjust pedal pressure so that the vehicle stopping time is 3-5 seconds.
3. Cool the brake system by driving at about 30 MPH for approximately 1 minute without stopping.
4. Repeat steps 1-3 ten times to complete the burnishing process.

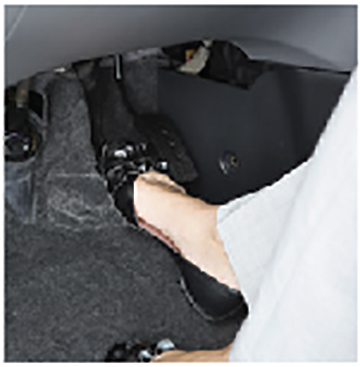
NOTE: Use a Brake Pedal Effort Gauge J-28662 to accurately measure and adjust brake pedal effort when diagnosing brake pedal travel. This tool is available from TECH MATE at 1-800-662-2001.
Brake Service
To ensure a high quality brake service, be sure to:
1. Finish rotors properly. This is one of the most important steps to prevent and eliminate brake noise. Use an on-car brake lathe. This on-the-car method is the best method to turn the rotor surface.
2. Properly install pads and shims. Refer to ASIST (Technical Service Bulletins and ESMs) for correct installation and lubrication of brake pads, caliper parts and hardware.
- Apply MOLYKOTE® AS-880N grease or equivalent to the facing edge of the piston and to all facing surfaces between the piston and pad. This will help dampen noise-causing vibrations.
- Lubricate sliding sleeves and sliding sleeve boots with rubber grease or Genuine Nissan Fluid silicone grease (P/N 999MP-AB002) and confirm smooth movement of the calipers.
- Apply MOLYKOTE® 7439 grease between brake pad retainers and brake pad ends to help repair brake clunk noise.
NOTE: Always refer to the appropriate ESM for instructions on pad, shim and pin lubrication.
NOTE: DO NOT get the grease on the brake pad friction surface.
3. Perform the following post-installation checks and operations:
- Confirm the brake pads fit snugly in the calipers. Replace worn components as necessary.
- Test drive after the installation and burnish the new brakes. Burnishing helps ensure the best results for a good brake job, including less chance of noise.
Burnishing Process:
a. Drive the vehicle on a straight, smooth road at about 30 MPH (50 kph).
b. Use medium brake pedal effort to bring the vehicle to a complete stop from about 30 MPH (50 kph). Adjust the pedal pressure so that the vehicle stopping time is around 3-5 seconds.
c. Cool the brake system by driving at about 30 MPH for approximately 1 minute without stopping.
d. Repeat the steps above ten times to complete the burnishing process.
4. Double check your work. It is important that you follow the steps outlined above.

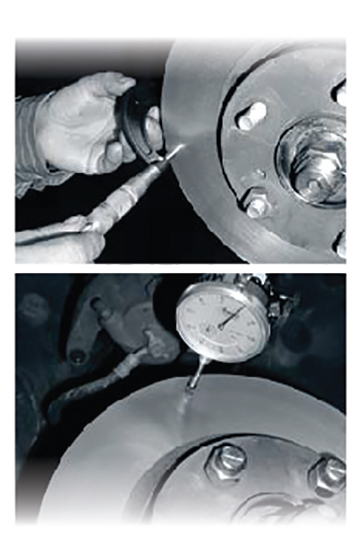
Rotor Indexing:
When installing a new rotor, a rotor that has been surfaced off the car, or a rotor that has been removed for any reason, use the following indexing procedure to ensure the minimum amount of rotor run-out.
1. Remove the rotor to ensure it is fully contacting the hub. Clean the rotor-to-hub surface if it is rusty or dirty.
2. Install the rotor and all the lug nuts. Tighten the lug nuts to specification.
3. Place a reference mark on the rotor and hub.
4. Measure rotor run-out with a dial indicator. If the run-out is above 0.001 in. (0.03 mm), continue with step 5.
5. Remove the lug nuts and shift the position of the rotor one lug then re-install the lug nuts.
6. Measure rotor run-out with a dial indicator. If the run-out is above 0.001 in. (0.03 mm), repeat step 5 until the rotor is positioned with the least run-out.
NOTE: Some vehicle models may have different run-out specifications [i.e., lower or higher than 0.001 in. (0.03 mm)]. Please refer to related bulletins or the applicable Electronic Service Manual (ESM) for proper run-out specifications.
7. If the run-out is still more than 0.001 in. (0.03 mm) after you find the position with the least amount of run-out, you will need to turn (resurface) the new rotors using the ProCut™ PFM Series on-car brake lathe.
So that is the scoop on brake service. We have discussed the three categories of brake issues: noise, judder and brake pedal feel. Then we covered the approved fixes for the above conditions that we have tried. No magic, just proven methods that will help ensure a brake job done right the first time and customer satisfaction with your work.
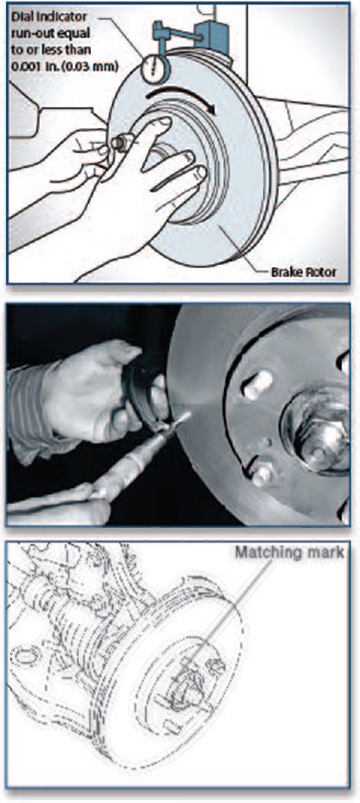
NOTE: If the rotor must be removed for any reason, mark the exact location (rotor to axle hub) before removing the rotor. Incorrect alignment during reinstallation will cause the run-out to change, possibly exceeding specifications. This could require the rotor to be turned again.